Happy Halloween Dear Reader! When I first saw Jenny from Picky Palate's Mummy Dogs I think I actually giggled and clapped. Yes I do those sorts of embarrassing things. And yes this is why Mr NQN gets embarrassed by my behaviour and asks me not to sing while walking through the shops. Suddenly I'll be singing and then notice that my hand is no longer clasped in his and he is walking several metres behind hiding his face in his shoulder. I shudder to think that if I become a parent, I'll be that eccentric lady that embarrasses their children-who am I kidding? I know I will be. However looking at how much I love Halloween, if I don't raise a little ghoul, then I will be surprised.
What I loved about these Mummy Hot Dogs was how relatively easy they were and how preparing them on the day took less than half an hour. I'm not including the time it makes to make the bread or pizza dough as of course that needs to be done ahead and all the better for a party I say. The less I have to do on the day the better for me.
Jenny's recipe called for Pillsbury Dough which we don't get here in Australia so I figured I would make a bread dough. But I was running out of time as I had events galore and things to do on Halloween and I recalled stashing some pizza dough in the freezer for emergency times such as these. I found that one dough round wrapped 4 of these frankfurters in an adequate way with a little left over dough. You could also try this with puff pastry too if you cannot get the pre-made bread dough which comes already rolled out which helps a lot but I found that with puff pastry, there were more joins as the pastry itself comes in a square and it is therefore shorter than the length that you can roll dough.
I know mummies' wrappings are supposed to be more white than yellowed but I blame the distractedness on the fact that I didn't hear the timer when it went off. If you watch it like a hawk then you can ensure that yours turn out only mildly yellowed like Jenny's. Kids, both young and old love the novelty of these and just make sure that you have some tomato sauce...ermm I mean blood ready for them to dip these Mummy Hot Dogs in.
And look out for Monday's story with a wrap up of my Halloween party! I promise that "normal" transmission will resume after then :)
So tell me Dear Reader, what embarrassing habits do you have?
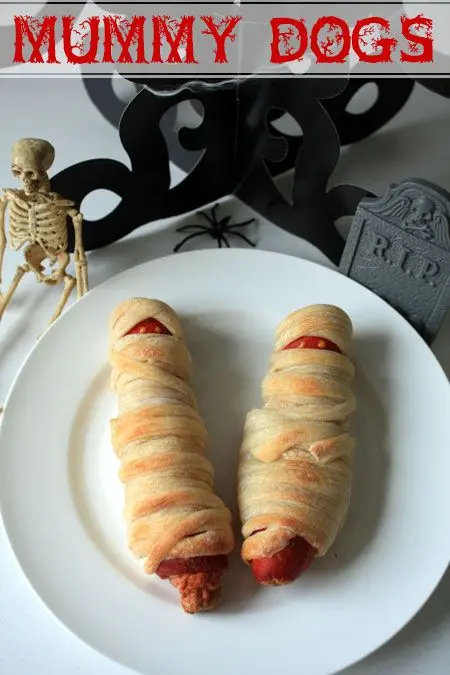
Mummy Dogs
Did you make this recipe? Share your creations by tagging @notquitenigella on Instagram with the hashtag #notquitenigella
Rated 5 out
of 5 by
7 lovely
readers. Share your rating:
24 frankfurt sausages (longer length although I'm sure you could do them with the cocktail ones too)
Pizza or bread dough or sheets of 4 sheets of premade puff pastry (see recipe below if you are making it from scratch)
Mustard
Step 1 - Preheat your oven to 190c/375F. Place a sheet of parchment on a baking tray. Flour a clean workbench surface and stretch out dough with your hands or with a rolling pin until it is a thinnish but even thickness. Cut into thin strips about 3-4mm wide.
Wrapping the Mummy Dog in puff pastry - as you can see there are more joins
Step 2 - Take a frankfurter and wrap it with a length of the dough and then repeat until the frankfurter is wrapped as shown making sure to leave a gap at one end to draw the eyes. Depending on how long you've rolled it will depend on how many strips you use but for me, I had 6 balls of dough from the below recipe and each ball of dough wrapped 4 frankfurters with a little left over.
Step 3 - Bake on prepared baking tray in oven for 10-15 minutes.
Step 4 - Remove from oven and dot mustard as eyes. Serve with bloody tomato sauce.
Makes 6 pizza crusts (about 9-12 inches/23-30 cm in diameter). Enough to wrap 24-30 frankfurts depending on how well you wrap them.
Ingredients
4 1/2 Cups (20 1/4 ounces/607.5 g) Unbleached high-gluten (%14) bread flour or all purpose flour, chilled (I used 3 1/2 cups plain flour and 1 cup of wholemeal flour)
1 3/4 Tsp Salt
1 Tsp Instant yeast
1/4 Cup (2 ounces/60g) Olive oil or vegetable oil (both optional, but its better with)
1 3/4 Cups (14 ounces/420g or 420ml) Water, ice cold (40° F/4.5° C)
1 Tb sugar
Semolina/durum flour or cornmeal for dusting
DAY ONE
Method:
Step 1 - Mix together the flour, salt and instant yeast in a big bowl (or in the bowl of your stand mixer). Place in fridge to chill.
Step 2 - Add the oil, sugar and cold water and mix well (with the help of a large wooden spoon or with the paddle attachment, on low speed) in order to form a sticky ball of dough. If you are using an electric mixer, switch to the dough hook and mix on medium speed for about 5 minutes.The dough should clear the sides of the bowl but stick to the bottom of the bowl. If the dough is too wet, sprinkle in a little more flour, so that it clears the sides. If, on the contrary, it clears the bottom of the
bowl, dribble in a teaspoon or two of cold water. The finished dough should be springy, elastic, and sticky, not just tacky, and register 50°-55° F/10°-13° C.
Step 3 - Flour a work surface or counter. Line a large container (with a lid) with baking paper/parchment on the bottom and side. Lightly oil the paper.
Step 4 - With the help of a metal or plastic dough scraper, cut the dough into 6 equal pieces (or larger if you want to make larger pizzas). To avoid the dough from sticking to the scraper, dip the scraper into water between cuts.
Step 5 - Sprinkle some flour over the dough. Make sure your hands are dry and then flour them. Gently round each piece into a ball. If the dough sticks to your hands, then dip your hands into the flour again.
Step 6 - Transfer the dough balls to the container and brush the tops with oil. Place lid on container.
Step 7 - Put the container into the refrigerator and let the dough rest overnight or for up to thee days.
NOTE: You can store the dough balls in a zippered freezer bag if you want to save some of the dough for any future baking. In that case, pour some oil(a few tablespoons only) in a medium bowl and dip each dough ball into the oil, so that it is completely covered in oil. Then put each ball into a separate bag. Store the bags in the freezer for no longer than 3 months. The day before you plan to make pizza, remember to transfer the dough balls from the freezer to the refrigerator.
DAY TWO
Step 8 - On the day you plan to eat pizza, an hour or two before you make it, remove the desired number of dough balls from the refrigerator. Dust the counter with flour. Place the dough balls on a floured surface and sprinkle them with flour. Dust your hands with flour and delicately press the dough into disks about 1/2 inch/1.3 cm thick and 5 inches/12.7 cm in diameter. Sprinkle with flour.


Reader Comments
Loading comments...Add Comment