
I had quite a crazed weekend this past one. In fact it was so hectic that I felt that I needed a weekend to get over my weekend. Do you ever have those times when you collapse into bed exhausted at the end of a Sunday night at 9pm? And whilst I love social engagements, all I wanted to do was get into the kitchen and bake these little buns and socialising like a mad woman meant that these were going to be a Monday afternoon project once the weekend was over.

And on the Monday morning I awoke feeling slightly run down or more accurately, run over. My legs ached from wearing heels all weekend - I used to be able to run miles in the things! I also awoke very parched in my throat. I had in fact dreamt of drinking a tall glass of water just before I woke-and that glass of water was delivered, randomly, by Don Draper from Mad Men. Make of that dream what you will. I wondered how on earth people handled other, even more ferociously busy weekends. We hadn't gone to bed at 3am like I had done so in the past and there wasn't that much alcohol involved for me. And when the phone rang, I groaned and it was hard for me to answer "Good morning" when all I felt like saying was "Good moaning".

Once I got into the kitchen, things got better. I made myself something delicious for brunch and set about to work on these buns. Before I knew it my fingers were folding the buns over and I became a more fluid moving individual and I felt human rather than shadow. Ahh the mysterious power of baking...
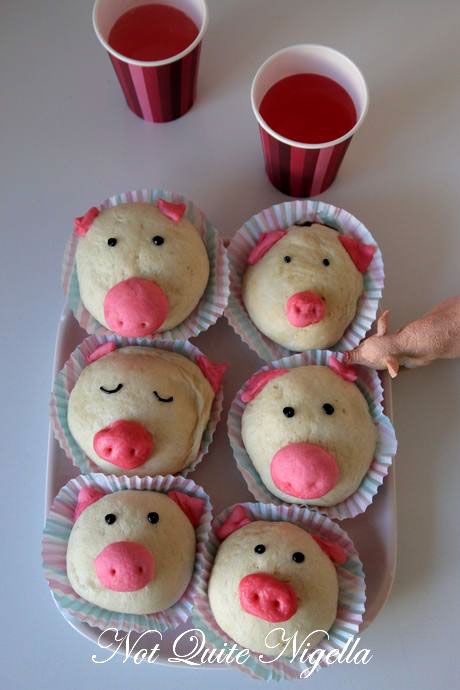
As soon as I saw these piggy buns on CG's lovely Cooking Gallery site I wanted to make them. She filled them with pork mince which sounds delicious (and don't tell Mr NQN or he'll be requesting them) but I just wanted to do a simple, sweet filling. They were surpringly easy, with simple details to them and very satisfying once made as they are soft and fluffy and snack sized. The part I liked the best was that each pig seemed to look slightly different with different expressions, much like a family of pigs would I suppose!
So tell me Dear Reader, do your weekends ever exhaust you and do you need a weekend to recover from your weekend?

Lil' Piggy Buns
Makes 20 small buns or 14 large buns
Dough:
-
3 cups flour
-
2 teaspoons bread improver*
-
1 tablespoon sugar
-
1/2 teaspoons salt
-
2 teaspoons instant dried yeast
-
1 cup lukewarm water
-
2 tablespoons oil
-
Filling and decorating:
-
2-3 cups of chopped chocolate, red bean paste (from Asian supermarkets), jam or whatever you would like to fill these sweet buns with.
-
1 black decorating pen or black icing pen with a fine tip
- Patty pans to serve them in
***Buyer's tip: bread improver can be found in the baking and flour section of the supermarket
**

Step 1 - Place the dry ingredients into the bowl of an electric mixer and mix with a spatula to combine. In a jug whisk the warm water and the oil. Set the mixer with the dough hook and on the slowest speed, add the water and oil mix and knead for about 5 minutes using an electric mixer or about 8 minutes if done by hand. Oil the bowl lightly as well as the top of the buns. If you don't have a warm place in your kitchen, cover the bowl with cling wrap and place the base of the bowl in another bowl of warm water for about an hour to rise. Punch it down (I love this part).

Step 2 - Get your patty pans ready to place the buns on. If you are making small buns, divide dough into 24 pieces, if large 16 pieces. They will expand and truth be told, I think mine were a bit large. Reserve the dough for 2-4 of the buns to colour pink for the ears and snout. Roll one piece of the white dough into a ball and then roll it out into a circle with a small rolling pin. You want to make the edges slightly thinner than the centre so once I rolled it out into a circle, I rolled the edges out even more. Keep the dough covered while you are making these so that it doesn't dry out.

_Rolled out a bit flatter around the edge with a raised centre
_
Step 3 - Place a spoonful of the filling in the centre and pinch the edges together. Place on the patty and continue shaping and filling the rest of the dough. The dough will expand slightly again.


Step 4 - Take a tiny amount of pink food colouring and mix it in the dough. Roll out about a third of it on a lightly flour dusted surface and cut into triangles for the pigs ears. Shape the rest into a snout shape and attach both with a little water onto the buns and poke two holes in the snout. If anything I thought of a shape and holes in a piece of Nutri Grain cereal for the snout-I hope you know what I mean and don't sound insane! But then again I just made buns in the shape of pig's faces so it's all relative...


Step 5 - You can steam these for 20 minutes or you can do it the fast and furious way and microwave 2 or 3 of them at a time for 1 minute on high. I tried both and the only issue with microwaving is ensuring that you don't overcook them and make them go hard and the filling burst out. Eat them while they are fresh and warm.
No actual pigs were harmed in the making of these, only their caricatures.


Reader Comments
Loading comments...Add Comment