Mr NQN sent me this website hidden in a tinyURL website the other day. I lasted about 7 seconds before I got bored with the scenery and looked elsewhere. The only reason I know this is because I got a big fat fail in red letters when I went to move the cursor to open up another website.
Oops.

You see I've never been good at relaxing. I can sit down for a few minutes before I get up because I see something that needs to be attended to or my mind has wandered off and I come up with an idea for something that I would like to cook or I suddenly decide that I need to learn everything that I can about Colony Collapse Disorder or the abandoned Mary Celeste ship. Just in case you know...
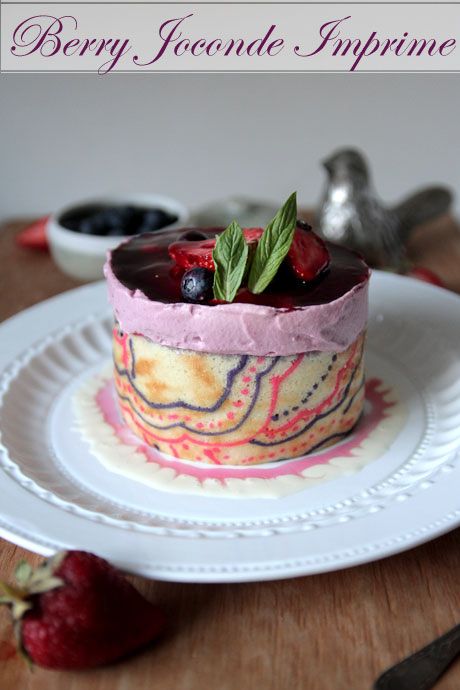
The reason why I had itchy wandering fingers was that I was in the middle of the latest Daring Bakers challenge. And it was a doozy. Another multi parter it was a challenge that involved making a joconde imprime with a colourful imprint. It was something that I never thought that I'd do and I was surprised at how relatively easy it looked. I was so eager to make this as I had always admired cakes with these patterns and like how I thought that ice cream cakes were made with magic when I was young, this was my adult version of a magic cake.

I hate to be a downer but the recipe had a few idiosyncrasies and I wish that I had read the advice of the other daring bakers that had made it before me. For starters it said that it baked in 15 minutes on 250C (v.v. hot!) whereas the reality was actually 6-7 minutes on 235C and at 14 minutes the kitchen had filled with smoke as the sponge was totally charred so I had to start all over again, something that I didn't relish as I was worried that I would run out of sponge. I did so I decided to make two individual ones rather than a large cake to share which I was going to bring to a dinner party.
Also the amount of jocande paste it made was quite out of proportion with what was actually needed and I could have easily made a quarter of it and had more than enough. The recipe also specified us to make the sponge beforehand and then make the colourful paste, draw patterns in it and freeze it hard which takes about 45 minutes depending on the pattern whereas the sponge should have been made later just before using it as it is a sponge and deflates with time.

Other than that I was happy with the fact that we had learned a new technique which is what Daring Bakers is all about. I've given my revised version of the joconde plus a simple berry mousse filling and berry gelatine topping but of course you could make this chocolatey or whatever tickles your fancy and the really fun bit is playing with the joconde print. You could make all sorts of amazing patterns in it or write names in it or might I even suggest this as a Valentines Day cake where you could write your beloved's name on it?
So tell me Dear Reader, do you find it hard to do nothing for 2 minutes?
Berry Joconde Imprime
Equipment required:
- Silpat
- ½ baking sheets or a 13 x 18 jelly roll sheet (rimmed baking sheet)
- Mixer (optional)
- Bowls
- Knives
- Offset spatula
- Regular spatula
- Pastry comb (optional)
- Rulers
- Spring form pan
- Biscuit cutter (or ring mold, or cut PVC pipe, or whatever else you can think of to use as a mold for individual desserts)
- Torte/entremets mold/Springform pan/ Trifle dish (for larger desserts)
- Cling wrap
- Parchment paper
- Gel, paste or liquid food coloring (optional)
Patterned Joconde-Décor Paste
YIELD: Two ½ size sheet pans or a 13 x 18 (33 x 46 cm) jelly roll pan
Ingredients
7 tablespoons/ 3.5oz/ 100g unsalted butter, softened
3.5oz/ 100g Confectioners' (icing) sugar
3-4 large egg whites - about 3.5 oz /1200g
3.8ozs oz/ 110g cake flour
Food coloring gel, paste or liquid
COCOA Décor Paste Variation: Reduce cake flour to 3 oz / 85g. Add 1 oz/30 g cocoa powder. Sift the flour and cocoa powder together before adding to creamed mixture.
Directions:
Step 1 - Cream butter and sugar until light and fluffy (use stand mixer with blade, hand held mixer, or by hand)
Step 2 - Gradually add egg whites. Beat continuously.
Step 3 - Fold in sifted flour.
Step 4 - Tint batter with coloring to desired color, if not making cocoa variation.
Preparing the Joconde- How to make the pattern:

Step 1 - Spread a thin even layer of décor paste approximately 1/4 inch (5 millimeter) thick onto silicone baking mat with a spatula, or flat knife. Place mat on an upside down baking sheet. The upside down sheet makes spreading easier with no lip from the pan.
Step 2 - Pattern the décor paste Here is where you can be creative. Make horizontal /vertical lines (you can use a knife, spatula, cake/pastry comb). Squiggles with your fingers, zig zags, wood grains. Be creative whatever you have at home to make a design can be used. OR use a piping bag. Pipe letters, or polka dots, or a piped design. If you do not have a piping bag. Fill a ziplock bag and snip off corner for a homemade version of one.
Step 3 - Slide the baking sheet with paste into the freezer. Freeze hard. Approx 15 minutes. Make the joconde sponge (see recipe below)
Step 4 - Remove from freezer. Quickly pour the Joconde batter over the design. Spread evenly to completely cover the pattern of the Décor paste.
Step 5 - Bake at 475ºF /250ºC until the joconde bounces back when slightly pressed, approx. 15 minutes. You can bake it as is on the upside down pan. Yes, it is a very quick bake, so watch carefully.
Step 6 - Cool. Do not leave too long, or you will have difficulty removing it from mat.
Step 7 - Flip cooled cake on to a powdered sugared parchment paper. Remove silpat. Cake should be right side up, and pattern showing! (The powdered sugar helps the cake from sticking when cutting.)
Joconde Sponge
YIELD: Two ½ size sheet pans or a 13 x 18 (33 x 46 cm) jelly roll pan
Ingredients:
¾ cup/ 180 ml/ 3oz/ 85g almond flour/meal - *You can also use hazelnut flour, just omit the butter
½ cup plus 2 tablespoons/ 150 ml/ 2? oz/ 75g confectioners' (icing) sugar
¼ cup/ 60 ml/ 1 oz/ 25g cake flour *See note below
3 large eggs - about 5? oz/ 150g
3 large egg whites - about 3 oz/ 90g
2½ teaspoons/ 12½ ml/ ? oz/ 10g white granulated sugar or superfine (caster) sugar
2 tablespoons/ 30 ml/ 1oz / 30g unsalted butter, melted
*Note: How to make cake flour: http://www.joythebaker.com/blog/2009/09/how-to-make-cake-flour/
Directions:
Step 1 - In a clean mixing bowl whip the egg whites and white granulated sugar to firm, glossy peeks. Reserve in a separate clean bowl to use later.
Step 2 - Sift almond flour, confectioners sugar, cake flour. (This can be done into your dirty egg white bowl)
Step 3 - On medium speed, add the eggs a little at a time. Mix well after each addition. Mix until smooth and light. (If using a stand mixer use blade attachment. If hand held a whisk attachment is fine, or by hand. )
Step 4 - Fold in one third reserved whipped egg whites to almond mixture to lighten the batter. Fold in remaining whipped egg whites. Do not over mix.
Step 5 - Fold in melted butter.
Trim the cake of any dark crispy edges. You should have a nice rectangle shape.
Decide how thick you want your Joconde wrapper. Traditionally, it is ½ the height of your mold. This is done so more layers of the plated dessert can be shown. However, you can make it the full height.
Once your height is measured, then you can cut the cake into equal strips, of height and length. (Use a very sharp paring knife and ruler.)

Make sure your strips are cut cleanly and ends are cut perfectly straight. Press the cake strips inside of the mold, decorative side facing out. Once wrapped inside the mold, overlap your ends slightly. You want your Joconde to fit very tightly pressed up to the sides of the mold. Then gently push and press the ends to meet together to make a seamless cake. The cake is very flexible so you can push it into place. You can use more than one piece to wrap your mold, if one cut piece is not long
enough.
The mold is done, and ready to fill.
Berry Mousse
Recipe adapted from Gordon Ramsay**
-
550g strawberries or blackberries washed, hulled and cut into halves or quarters (I used blackberries)
-
2 sheets of leaf gelatine
-
2 egg whites
-
10 tablespoons of caster sugar for egg whites
-
400ml double cream
Step 1 - Soak gelatine sheets in cold water to soften. Put the strawberries in a non stick pan and cook until soft. Once soft, press through a sieve to extract every bit of juice. Cool.
Step 2 - Drain the gelatine and squeeze gently to remove excess water. Add to the warm strawberry juice and mix well until gelatine is dissolved.
Step 3 - Beat the egg whites until soft peaks form, then add sugar tablespoon by tablespoon until you get stiff peaks.
Step 4 - Whip the cream until you get a good thick dolloping consistency. Fold this and the stiff egg white into the cooled (make sure its not warm) strawberry mixture. Place in fridge to firm up slightly and then put into a piping bag fitted with a plain nozzle to firm up more. Pipe over the joconde base and smooth over the top.
Blackberry Jelly
-
2 sheets titanium strength gelatin leaf
-
2 cups blackberry juice
-
2 tablespoons caster sugar
-
berries and mint leaves to decorate
Step 1 - Gently heat up the blackberry juice and sugar in a small saucepan until the sugar is melted and remove from heat. Meanwhile in a separate bowl soak the gelatin leaves in cold water.
Step 2 - When the gelatin leaves are soft and pliable, squeeze the water out of them and mix them into the warmed berry juice. Cool until it becomes a little thicker and more viscous and ensure that it is not warm at all before pouring over the cake. Dip the berries in the jelly glaze too. Refrigerate until set and serve cold.


Reader Comments
Loading comments...Add Comment