Now that I've finally learned to drive, Mr NQN has turned his hand to improving another area of my skills that is lacking: riding a bike. I reluctantly agreed only because it really does stand in the way of some opportunities. I was in Bangkok recently and wasn't able to completely participate in a bike ride and I hated the kerfuffle that had to me made around me so that I could join in. So after about 14 years of trying to persuasion, I finally agreed that I should perhaps, just maybe, learn
how to ride a bike.
I had to get the smallest adult's sized bike available (the other choice was a kid's bike and I will admit that I looked at the rainbow streamers with some wistfulness) and the man at the bike shop adjusted it for me. If I ever felt small I felt absolutely tiny sitting perched atop this bike and I wondered what people less than 5 feet tall do when they try and learn how to ride. We discussed methods and tips and I said that I'd like to wear not just a helmet and gloves but an entire suit made of
those sealed air packets that you get for shipping delicate items in the post. I'd need two layers of sealed air, one to cushion the impact and one to cushion me and it actually sounded like the most pleasant way to learn how to ride a bike. Longtime readers will know that the reason why I was so reluctant was because an ex boyfriend decided to have me learn on his bike which was for a 6 foot 2 tall person where my feet were over a foot from touching the ground and I learned in a dark concrete
car park late at night. I still have the scar on my chin from that incident.
Mr NQN is an excellent teacher as well as being patient which is an enormous help. We practised in Centennial Park and he asked if I would like to try it near the lake.
"Oh no thank you, there are reeds and a lake and I'll fall in!"
"But the reeds are soft and they will cushion your fall."
"But but but....the leeches!!" I shrieked, because when all else fails, bring up your biggest fear, leeches.
I put the helmet and gloves on in a quiet area with a gentle hill, got on the bike and Mr NQN promised that he wouldn't let go. It wasn't a pretty start, something inside me went a bit haywire and my inner Rainman came out and I'd yell out things like "Pine cone!! Big Branch! Huge Branch!! Too fast too fast too fast too fast!!!" all in rapid fire commands which only served to embarrass me further by drawing attention to my efforts. After about half a hour, I finally managed to get the hang of
steering but I started getting a bit sore so we decided to call it a day. Mr NQN thought that it was a successful first try (and we're just not calling the carpark attempt because it was over in about 60 seconds between when I got on that bike and when I hit the concrete bar).
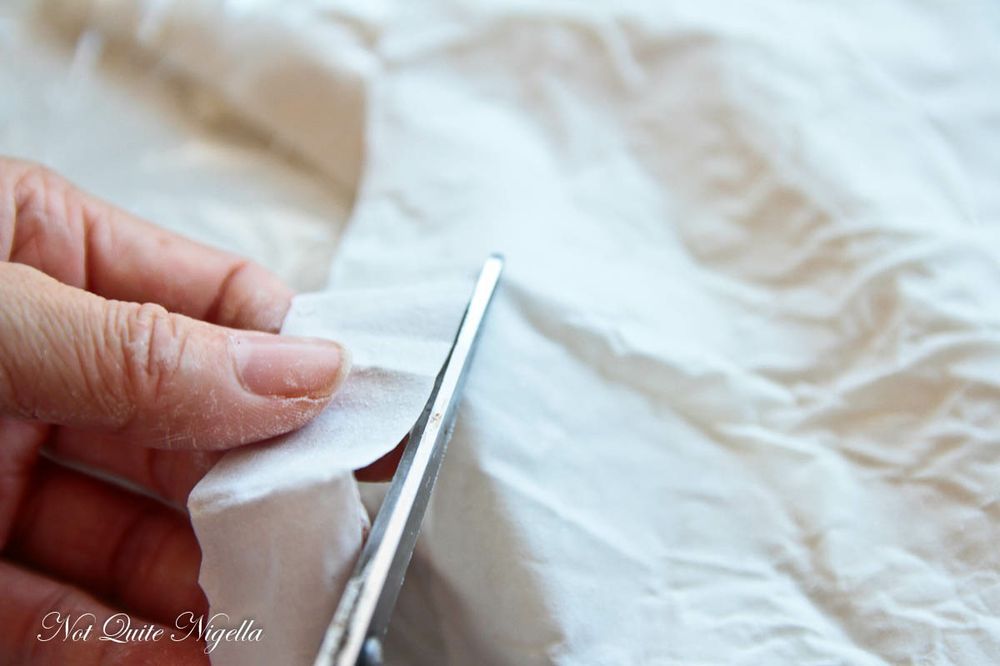
I still remember the first time I tried making baklava. It was less stressful but not entirely so. I'm more comfortable in a kitchen than in open plains or among nature but this was not your ordinary kitchen. It was a single man's kitchen. Mr NQN's kitchen was furnished with plates, cutlery and tools from previous flatmates. There seemed no shortage of turners but naturally there was no pastry brush.
Undeterred and mainly fueled by greed at wanting to eat a big tray of baklava, I improvised a pastry brush by rolling up some baking paper and cutting little streamers to simulate brush bristles. This worked somewhat for some of it and by the end, I had something like baklava. I'm glad to report that unlike the bike riding, I have improved on baklava making and now it's one of the go to items that I like to make for a crowd as it makes such a vast quantity.
I wanted to make a variation for a recent dinner party we were invited to so remembering that many people find baklava very sweet, sometimes too sweet (whereas I can eat six pieces!) I thought I'd balance the baklava with salted caramel instead of regular caramel. What resulted was in a baklava that disappeared within a flash, each piece was nutty, buttery and with just the right amount of salt balancing the sweet caramel. If I can make a promise it's that this is definitely worth making
although I can't promise that riding a bike is easy... ;)
So tell me Dear Reader, what is one skill that you've yet to master? And can you ride a bike? And are you a salted caramel fan?
Salted Caramel Baklava
Did you make this recipe? Share your creations by tagging @notquitenigella on Instagram with the hashtag #notquitenigella
Rated 5 out
of 5 by
1 lovely
reader. Share your rating:
375 grams/13.25ozs packed of filo pastry sheets (refrigerated kind is easiest to work with)
350g/12.36g/3 sticks salted butter
1 cup walnuts
1/2 cup pistachios plus an extra 3 tablespoons to sprinkle over at the end
2 tablespoons brown sugar
1/2 teaspoon cinnamon
1/4 teaspoon nutmeg
1/2 teaspoon salt plus Fleur de sel salt to sprinkle over at the end
Syrup:
1.5 cups water
1 1/4 cups sugar
1/4 cup honey
1/4 teaspoon salt
Directions
Step 1 - Make the syrup first. It will need about 1.5 hours to cool at room temperature and is best when cold so I like to make this the night before. Combine all ingredients on low heat until sugar dissolves completely. Then turn up heat to medium high and boil for 10 minutes until syrup thickens a little to a syrup-you don't want it too thick though as you want to pour it over the pastry. Cool at room temperature and then refrigerate for best results.
Step 2 - When ready to assemble, remove the pastry from the fridge but keep in the box. Brown the butter to give it an extra nutty flavour. Simmer the butter until it becomes white and foamy on top, skim off this white foam and discard the foam. Turn heat up a little to medium and when it starts to brown remove from heat (the aroma is a good way to tell, it will smell nutty). Set aside to cool.
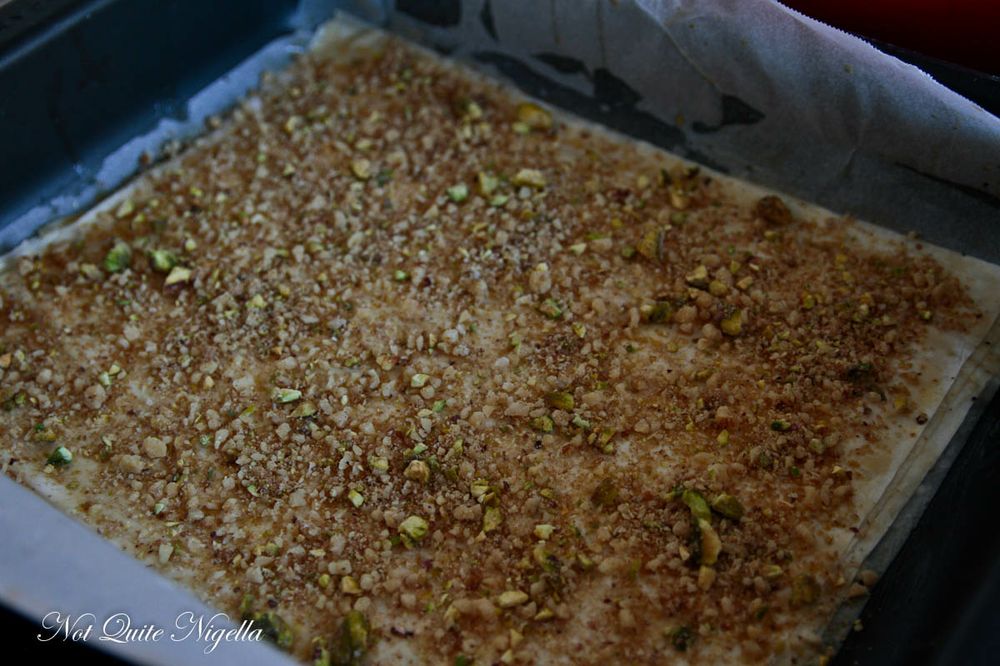
Step 3 - Process the nuts, brown sugar, cinnamon, nutmeg and salt and place in a bowl.
Step 4 - Unwrap the filo and using a sharp knife trim the pastry so that it fits your pan if you need to-I didn't as used a large baking dish. The pan was slightly larger than the pastry but that was okay. I lined it with parchment to make it easier to remove from the dish at the end. Place excess pastry if you have any (I didn't), back in the packet and refrigerate.
Step 5 - My filo sheets were double the size of the pan so I cut them in half. Place a large sheet of cling film on top of the filo to cover filo to stop it from drying out. It becomes really hard to handle if it dries out and cracks very easily.
Step 6 - Place one layer of filo on the parchment lined dish and using a pastry brush, brush with the browned butter. Complete 10 layers of buttered filo pastry. At this point you'll think "this is such a labour of love..." and may lose patience with it.
Step 7 - Spoon a thin layer of the nut mixture onto the pastry layers and then keep alternating two layers of buttered Filo with a thin layer of the nut mixture until the nut mixture is used up. Then finish with layering with the rest of the filo pastry and buttering between each layer. Butter top layer too.
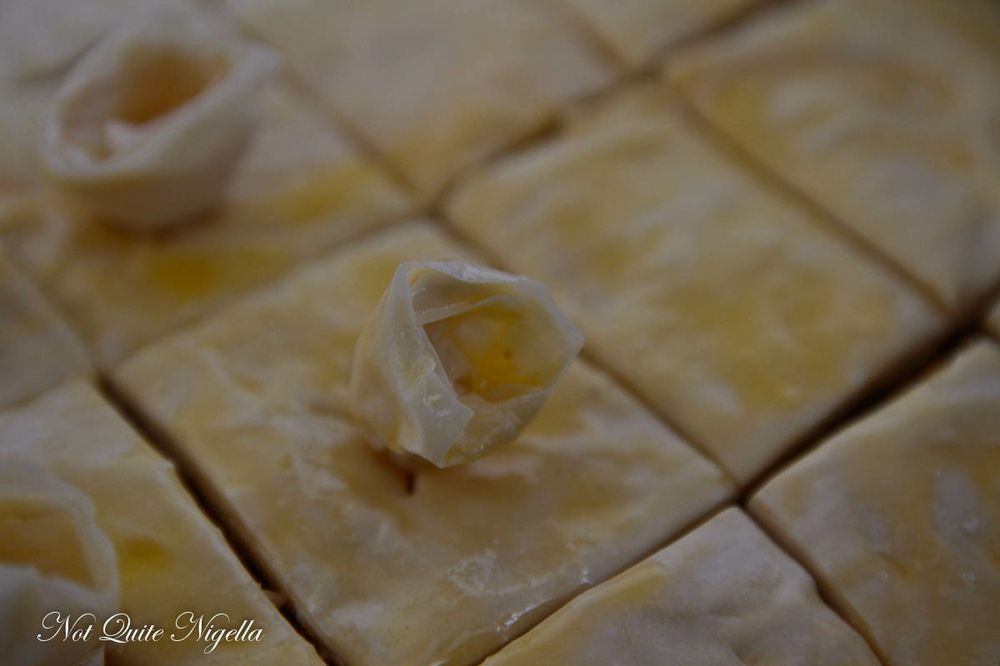
If you want to do the flower buds on top, cut a thin piece of the pastry like a ribbon and curl around a finger as shown. Place the completed flower buds under some cling wrap so that they don't dry out. They're time consuming and quite honestly I only did a few like that because I was getting tired of shaping each flower bud.
Step 8 - Using a sharp knife, cut into the baklava and then cut squares as shown. I used a sharp knife to cut through most of the layers but then a blunter knife to get right to the bottom so that I didnt scratch the baking dish. Butter edges with more butter. If you're doing the flower buds, cut a small "x" into the centre of a piece and dip the buds in the butter and gently wedge into the crevice made by the "X".
Step 9 - Bake in the 180C/350F degree oven for 30 minutes then lower the heat to 150C/300F and continue baking for 30 minutes or until the pastry has puffed up slightly and taken on a light golden hue. While it is baking, check on the consistency of the syrup and make sure that it is cold and pourable-if it is too stiff, just add a little cold water until you get the right consistency.
10 . Remove pastry from oven and while it is still very hot, carefully pour the cold or room temperature syrup over, a bit at a time until the syrup is absorbed. The pastry will make a little crunch or crackle noise when you do this. Sprinkle the reserved chopped pistachio and some fleur de sel salt on top of the baklava and cool at room temperature. When cooled, you can lift the piece of parchment at the sides and cut the baklava on a chopping board. I placed each one in a paper patty pan to
serve. Store at room temperature for 2-3 days.


Reader Comments
Loading comments...Add Comment