Being Gordon Ramsay: Attempting a 3 Michelin star dessert. Strawberry & Mint Millefeuille with Honey Ice Cream

I don’t know if sometimes I should be committed to an institution or not. I admit that there’s a part of me that looks at something difficult and rubs my hands with glee thinking “Hmm I’d like to try that”. And that’s the part of me that probably should be institutionalised. I’m studying for my Ps and my husband keeps telling me that it’s not that hard, that millions of people already have theirs and that that should prove that it is indeed something easily within reach to an able bodied person. However a perverse part of me knows that if only 5 people in the world had a Driver’s License, then I’d be more interested in joining that club than one where millions of people belong. It’s utter foolishness for the most part as if I try, I probably wouldn’t get in but it’s the want in me that desires it.

This item was the best looking of the very gorgeously photographed 3 Star Chef book by Gordon Ramsay in the section he calls “The Dark Arts” (so Harry Potter, love it). So naturally I wanted to try and make it. I knew that I would have to make some adjustments (I used strawberries rather than rapsberries, I made honey ice cream instead of milk and one mousse type was canceled based on the amount of time it took to do another part, but more on that later). So was I able to recreate a 3 Michelin star restaurant dessert? Not exactly really and not without some adjustments to his recipes. I have to say that there were some crucial details missing for those who have never made the tuiles before and some things were just so not possible that I abandoned the recipe and made my own version (the directions for Italian Meringue for the mousse).

I had some issues with parts of this recipe so I’ve included the easier version which I know worked. I wouldn’t want my readers to go through the trauma of a failed recipe. And this dessert was actually served at Royal Hospital Road as seen on the Stomach Expansion blog. So without further ado, please take my hand and I welcome you to 
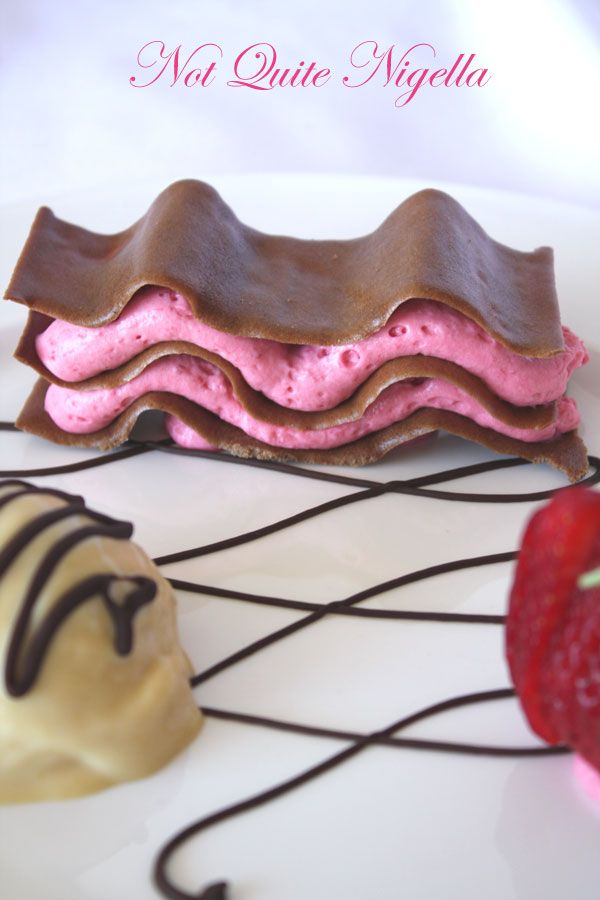
the saga that was the Strawberry and Mint Mille Feuille with Honey Ice Cream!

Strawberry and Mint Millefeuille with Honey Ice Cream

For Chocolate Figure 8 swirl decoration

The very first thing I tried, before anything else, was making the pretty patterns in chocolate. If you’re confident you can do them, skip ahead to make the ice cream first as that will need time to freeze. I figured that if I couldn’t do those, then I wouldn’t bother with the rest of the dessert as they looked so spectacular and felt that they added so much to the presentation. So I took out our entire set of plain white plates, all 8 of them, melted some dark chocolate in a zip lock steamer bag, snipped off the end and went to town on the plates. My first was a spectacular failure but by the 5th or 6th I had managed to get something sort of like what he has in the book. The key was even pressure and not pressing too hard, witness when I started to put too much pressure and the squiggly lines that ensued.

On the right hand side of the plate was where I started to put too much pressure and hence the lines turned squiggly

If this is your first time:

  • 100g of dark chocolate
  • piping bag with small end snipped off
  • as many plates as you may need, practise makes perfect

1. Whilst the chocolate is warm and liquid, make figure 8 swirls starting at the end of one plate (towards the centre) and swirl out drawing 8’s. Finish in the centre of one end of the plate with an emphasis. Do not squeeze too hard, this will cause the lines to be squiggly. Ideally I should think that one of those squeezy sauce bottles with a thin tip would be better but mine had too big a dispensing hole.

Chocolate Tuiles

“WRONG! That’s way too thick! What are you f*$*(*&^(*g doing?” I hear Ramsay say in my head

The second part was the other thing that I had never done before, Tuiles. The recipe leaves out a crucial detail in how to divide the mixture and indeed I found that making even half of the mix would yield enough tuiles for the task even with some breakage. What is key is how thin the tuile mixture has to be spread out. The first time, I put it all down and ended up with a thin cake, nothing remotely biscuitty as you can see above. Also his instruction of 2 wooden spoons next to each other should actually read that you will need 6-8 wooden spoons in sets of 2 next to each other and had me scrambling for spoons of an equal handle width which I of course only had two being a non commercial kitchen. I was so peeved after that that I had a bit of a tantrum Ramsay style and retreated to the internet to soothe myself with some LOLCat action. Turns out after my next batch that the wooden spoons weren’t needed, read on below…

Thinner than thin tuile mixture, the greaseproof paper buckles a little (see waves)

I later returned and made another half lot of the batter. This time I made them paper, paper thin, which was hard on the greaseproof paper as it kept wanting to warp and fold underneath it. I baked them for the time needed and straight away was all set to drape them on the spoons when I realised that the little buggers were already frozen in time. Another mini tantrum ensued and I contemplated some more internet distractions (failblog this time, I should’ve put this on it). I regrouped and made one more lot, this time putting some knives and spoons underneath the paper when putting it in the oven so that it would set in the oven with the wave pattern. Finally, somewhat of a success (although not as pretty as Chef Ramsay’s). I didn’t take photos as I was too exhausted mentally to do so.

This amount will make about 24-26 tuiles of a paper thin thickness (the way they should be). I actually halved Gordon Ramsay’s original recipe quantities although the ingredients and method remain the same.

  • 30ml whole milk
  • 35g muscovado sugar
  • 35g icing sugar
  • 75g plain flour
  • 7g cocoa powder
  • 28g egg white (about 1 medium egg white)

1. Place milk and muscovado sugar in a small saucepan on low heat until the sugar melts. Cool.

2. Sift the icing sugar, flour and cocoa powder in a bowl.

3. Stir in cooled milk and egg white (a little at a time) and mix well so that there are no lumps.

The Tuile batter

4. Preheat the oven to 180c. Line 2 baking sheets with greaseproof baking paper and using a palette knife, use about half of the mixture (or even less) to make a really thin layer of mixture across the surface. It needs to be thin enough so that you can draw 12 12×3cms rectangles using the edge of the palette knife and the lines will stay drawn. Then slide two oven proof long handled items about the thickness of two wooden spoon handles under them. Slide into oven carefully making sure not to move the handled items.

5. Bake for 5-7 minutes and cool. Store in airtight container.

Honey ice cream

Tuiles and Chocolate patterns done, I was more confident with the mousse and ice cream. I wasn’t going to make a milk ice cream as I only have a Kitchenaid ice cream maker which takes up too much room in my freezer (milk freezes in large crystals so a proper ice cream churner is necessary) so I made a honey ice cream instead. This was easy and the result was voluptuous and so ambrosially honeyed.

  • 500ml cream
  • 4 egg yolks
  • 1/2 cup of runny honey

1. Heat cream in small saucepan until almost bubbling but not quite. Meanwhile beat egg yolks and honey together. When cream is ready, pour in honey egg mixture and stir constantly until mixture coats the back of a spoon. Cool in sink with ice cubes then freeze until set.

Strawberry and Mint Mousse

As for the mousse, I made the strawberry sauce which was no hardship, the recipe then suggested that we make Italian Meringue which is one of the harder meringues as it requires a sugar thermometer. However he wanted us to boil the sugar, water and glucose syrup for 5-7 minutes which simply resulted in a caramel (and a burnt one if I had let it go for the whole 5-7 minutes). So after chucking a saucepan with burnt caramel in the sink, I beat two egg whites, added some caster sugar and made a regular meringue. Then I added in the whipped cream and made a mousse (which by the way is fantastic, worth serving on its own even).

This may make more than you need but halving it might not be enough. Trust me, it’s divine so just enjoy eating the rest.

  • 550g strawberries washed, hulled and cut into halves or quarters
  • 2 sheets of leaf gelatine
  • 2 egg whites
  • 10 tablespoons of caster sugar for egg whites
  • 400ml double cream
  • 7-8 mint leaves sliced into thin shreds

1. Soak gelatine sheets in cold water to soften. Put the strawberries in a non stick pan and cook until soft. Once soft, press through a sieve to extract every bit of juice. Cool.

2. Drain the gelatine and squeeze gently to remove excess water. Add to the warm strawberry juice and mix well until gelatine is dissolved.

3. Beat the egg whites until soft peaks form, then add sugar tablespoon by tablespoon until you get stiff peaks.

4. Whip the cream until you get a good thick dolloping consistnecy. Fold this and the stiff egg white into the cooled (make sure it’s not warm) strawberry mixture. Place in fridge to firm up slightly and then put into a piping bag fitted with a plain nozzle to firm up more (I left this overnight as I was too tired after all the other effort but you could leave it for a few hours).

5. Make scoops of ice cream on a plate and stow in the freezer. Meanwhile heat chocolate and fill piping bag with it and drizzle it over the ice cream. Place back in freezer until ready.

5. To assemble the plate, take your chocolate decorated plate and pipe two blobs of mousse. Place the tuile and pipe two lines of mousse on each tuile, layer and repeat then top with third tuile. Cut the strawberry and place a mint leaf in it. If the strawberry doesn’t sit up properly, use a bit of piped mousse to hold it in place. Lastly add an ice cream scoop to the plate.

Adapted from 3 Star Chef by Gordon Ramsay

If you enjoyed this post, why not share it with your friends?

Print Page

Subscribe to Not Quite Nigella

Subscribe to Not Quite Nigella to receive daily updates via email. Just enter your email address and press Subscribe.

Related Posts

36 Comments | Add your own

  • 1. Iron Chef Shellie | October 8, 2008 at 8:19 am | #

    Looks gorgeous!! … try playing his game for Nintendo DS… then you will hear insult you!! Luckily he wasn’t there in your kitchen!
    x

    PS. Good luck for your Ps!!

  • 2. Y | October 8, 2008 at 8:55 am | #

    Mmmm.. honey ice cream.. You certainly are a star for attempting this all the way through! (3 stars even!) I’m not sure I would’ve had the patience once I hit the first stumbling block. A few suggestions for next time if I may .. chocolate in a paper piping bag (make a paper cone out of baking paper) is way easier to pipe because you can use it the way you would a pen. Also, if your baked tuilles have set before you can shape them, you can pop them back into the oven just for a little while and they will be manageable again.

    Zuni roast chicken and now this! Seriously, can I come to your next dinner party please?? :D

  • 3. Cappucino | October 8, 2008 at 8:57 am | #

    Hey NQN, Sorry to hear this dish was such a pain, it looks great and I’d like to order one.

  • 4. belle | October 8, 2008 at 11:58 am | #

    You are so clever! I’d like to order one as well. Better make that two.

  • 5. SydneyGal | October 8, 2008 at 12:57 pm | #

    This is great. I love a good recipe review, and even better when one of the “greats” has gotten it wrong or made assumptions and somebody else gets to fix them for me. Not sure I’d try all this but the strawberry mousse does look delish – and like previous commenters I’m available to help dispose of the leftovers.

  • 6. Bria | October 8, 2008 at 2:27 pm | #

    Fantastic job!! I haven’t been game enough to try anything from that book except the tarragon cream (delicious by the way), but you’ve inspired me! Once I get some free time, i’ll definitely try some of the recipes out. I still have no idea how you have the time to bake and eat out so much!

  • 7. justJENN | October 8, 2008 at 2:41 pm | #

    Gorgeous.

  • 8. Cakelaw | October 8, 2008 at 5:16 pm | #

    These look amazing – well worth the effort. They look like they were hard – if someone served this to me at a dinner party, I would be so impressed. I like the tip about putting the spoons under the tuiles before putting thme in the oven – will have to try and file that in my memory for future. use. Tremendous end result – just gorgeous!!

  • 9. Maria T | October 8, 2008 at 6:19 pm | #

    Ooo la la! Very crafty stuff! You did a brilliant job pulling off a Ramsay creation.

    Aesthetically pleasing and definitely Michelin star quality. Gordon would be proud!

  • 10. Reemski | October 8, 2008 at 7:31 pm | #

    Yay for you! I’ve never attempted anything as gorgeously complicated as this…well done you! :-)

  • 11. Su-yin | October 8, 2008 at 9:08 pm | #

    Wow. I can’t believe you attempted this, I think it looks amazing! And it must have taken at least an entire day.

    Came across your blog a few weeks ago, and am now totally hooked. :)

  • 12. FFichiban | October 8, 2008 at 10:53 pm | #

    At least they were worth all the trouble weren’t they :D ? Cos they look absolutely fantastical and the sense of achievement is greater after a few attempts :D !

  • 13. Not Quite Nigella | October 8, 2008 at 11:04 pm | #

    Hi Iron Chef Shellie-Haha I don’t think I fancy the thought of being shouted at by GR :lol: Thankyou so much! I hope it won’t be too long-although 120 hours seems like an eternity!

    Hi Y-The honey ice cream was one of my favourite parts :) I gave up so many times but something drew me back-be it stupidity or masochism :lol:

    Ahh cool, thanks for the hints. What was strange was that the tuiles were instantly hard as soon as I took them out. Did I cook them too long or were they too thin?

    Haha my next party will be a slightly more Gothic theme (based on an upcoming holiday), I don’t know if you’d want to come! ;)

    Hi cappucino-Thanks so much but I’m afraid I don’t have the energy to make another :lol:

    Hi belle-Thanks so much, I’ll make more mousse and ice cream but I’ll retire the tuiles for now or until I get another recipe for them :lol:

    Hi SydneyGal-I just had to pick it apart given the stumbling blocks I encountered. I had some friends Queen Viv and Miss America help me with the mousse as I couldn’t face it any more :lol:

    Hi Bria-That was one dessert that I wanted to do, it looks gorgeous and yet straightforward. Good to know that it is delicious :)

    Hi justJENN-Thanks so much! :)

    Hi Cakelaw-Thanks for your lovely and encouraging words :) I would definitely serve part of this again, I think if I could get some ready made tuiles then I’d be happy :lol:

    Hi Maria-Thankyou! :) All I could think about was him yelling “they’re too thick! Wrong!” which didn’t help :lol:

    Hi Reemski-Thanks! I don’t know if I would do it again, I think I’d do a simpler dessert but I did like the challenge-after it of course though, not during it (there was a lot of swearing involved :lol: )

    Hi Su-yin-You’re about right, it took about a day! :lol: Sometimes I think that I lack judgement… :P Thankyou so much! So glad to hear that!

    Hi FFichiban-Thanks! It was actually a really delicious dessert I have to say after all of that drama :lol:

  • 14. snooky doodle | October 8, 2008 at 11:20 pm | #

    wow these look awesome. I would have given up after the first failure. Thanks for the useful info. I wish to try these :)

  • 15. Sandie | October 9, 2008 at 1:32 am | #

    You earn an A+ for effort!

    I about died laughing when I read your thought, “WRONG! That’s way too thick! What are you f*$*(*&^(*g doing?” I hear Ramsay say in my head.”

    Too funny…mostly because that is probably EXACTLY what he would have said. Regardless, you were clearly rockin’ the kitchen on this one. Good job!

  • 16. Patricia Scarpin | October 9, 2008 at 4:26 am | #

    I admire you so much for making this recipe, Lorraine! It turned out so beautiful, I have to add.

  • 17. Angela | October 9, 2008 at 6:42 am | #

    This is beautiful, Lorraine! Sorry to hear that the recipe writing wasn’t up to scratch, but you should be really proud of yourself for recreating such a gorgeous dessert!

  • 18. Y | October 9, 2008 at 7:49 am | #

    Well they don’t look overcooked at all, so I don’t think you baked them just right. Tuilles can be tricky and usually require quick shaping after they have been pulled out of the oven. Maybe that was it? Anyway, you certainly pulled it off in the end, so it doesn’t matter :)

  • 19. grace | October 9, 2008 at 9:20 am | #

    what a fantastically fancy treat! seems to like you executed it perfectly–bravo!

  • 20. Anita | October 9, 2008 at 1:39 pm | #

    Wow! These look fantastic! From the first picture, it looked like you had no trouble at all, I’m a little reluctant to try the recipe with all the troubles you went through.
    At least it looked perfect and it sounds like it tasted fantastic too!

  • 21. anamika: the sugarcr | October 9, 2008 at 6:19 pm | #

    Hi nqn
    this is my first time on your blog. I simply enjoyed reading your posts ….informative,appetising and kept me glued till i finished reading.

  • 22. Not Quite Nigella | October 9, 2008 at 9:48 pm | #

    Hi snooky doodle-I really felt like it at times :lol: Best of luck with it!

    Hi Sandie-Why thankyou! :) If anything I suppose GR would’ve probably used more swear words :lol: Thanks again for your lovely comment!

    Hi Patricia-Thankyou so much :) It was exhausting but thankfully delicious, I might’ve killed someone if it weren’t :lol:

    Hi Angela-Thankyou! :) I think he was writing it for a pastry chef! I never want to see a tuile again :lol:

    Hi Y-Gordon said wait a few seconds but I grabbed them as soon as they came out but they were stiff as a board already :( Very peculiar.

    Hi grace-Thanks! So glad that the drama didn’t show up in the dessert although I was the one whimpering in a fetal position in the background.

    Hi Anita-Thankyou so much :) I think if you try it using the recipe I gave (whcih is revised from the original) you’ll find it a lot easier, very doable even ;)

    Hi anamika-Thanks very much, that’s lovely of you to say! :)

  • 23. Maria | November 3, 2008 at 11:52 am | #

    Oh Bravooooooooo!!!!!!
    (((Applause))

    Seriously you deserve it!

    Thank you for starters for going to the trouble of explaining/demonstrating… everything!

    And :lol: at the Gordon Ramsay comment in your head! Haha!! I sometimes hear him in my head too.. how funny.

    Years ago, I don’t know if you remember the show “Friends for Dinner”? It was on either ABC or SBS?

    ..”The incredibly popular Friends For Dinner, sends one of Britain’s best chefs into an ordinary kitchen to help eight willing novices prepare a gourmet feast…”

    http://www.lifestylefood.com.au/shows/show.asp?id=90

    Anyway, it was this show that took away the fear of “too hard” when it came to complicated, posh-looking recipes. I saw every day folk constructing a full dinner party menu successfully (granted, the chefs were there to help for some of the time). And the ‘friends’ for dinner were always mightily impressed.

    I think of your dessert as one I’d have seen on that show. And I’m impressed, so *well done*! :D

  • 24. Not Quite Nigella | November 3, 2008 at 10:39 pm | #

    Hi Maria-Thankyou so much! :D Oooh I haven’t seen that show but it looks great! I don’t have cable tv though so I guess I’ll miss out on it. Ah well, maybe FTA will play it as they love anything GR related. Thanks again :D

  • 25. peabody | December 2, 2008 at 5:14 am | #

    Looks really good and like a lot of work.

  • 26. Not Quite Nigella | December 2, 2008 at 8:39 pm | #

    Hi peabody-Thanks so much! It was quite a lot but delicious in the end (thankfully :lol: )

  • 27. Gary | January 23, 2009 at 7:15 pm | #

    Fantastic effort. It looks sublime. Very very impressive

  • 28. Not Quite Nigella | January 23, 2009 at 11:17 pm | #

    Hi Gary-Thankyou very much! :)

  • 29. pigpigscorner | January 30, 2009 at 12:00 pm | #

    wow this looks amazing!

  • 30. Not Quite Nigella | January 30, 2009 at 9:16 pm | #

    Hi pigpigscorner-Thankyou so much! :)

  • 31. Louise | June 4, 2009 at 10:13 pm | #

    Hi,
    I started a project this year to cook every dish in the 3 Star Chef cookbook. Just searching around the net seeing what has already been attempted… I haven’t done this one yet. You did a good job of it, I’ll be sure to visit back for tips. I find the desserts in this book a little terrifying!

  • 32. Not Quite Nigella | June 5, 2009 at 1:21 pm | #

    Hi Louise-Best of luck with it! The desserts aren’t easy are they! :)

  • 33. Jordy | June 16, 2009 at 4:41 am | #

    I love your blog. I’ve been trying to make his recipes as well. Not in presentation, but I see you fairly succeeding in a ‘normal kitchen’. Absolutely awesome job, on all of the other things as well!

    Keep it up.

    (rss-feeded! :) )

  • 34. Cindy | July 28, 2009 at 3:29 pm | #

    This is one of my favourite desserts. The first time I made it, I cut individual pieces of baking paper to size and coated them. The next time (and all subsequent efforts), I skipped the tuille altogether and just used super thin (ie tuille thickness) layers of dark chocolate which you can cut into pretty shapes before it is completely set. Not that I am any chef, but I actually think the straight chocolate tastes better with the mousses than the tuilles (and is a whole lot quicker and easier to not only make, but to clean up also!!)

2 Trackbacks/Pingbacks

Post a Comment

Your email is never published nor shared. Required fields are marked *
*
*