
Want to learn some clever tips and the secrets of travel and portrait photography? There is always so much more to learn about photography for most of us. During a two day workshop in Queenstown to launch the new Olympus OM-D E-M10 Mark III we learnt some clever new skills from photographers Lisa Burns and Rachel Devine. Here I share 10 tips on how to produce great travel and portrait photos.
Travel Photography Tips by Lisa Burns
Number 1: Use reflections for stunning images

This was my favourite photography tip and all you need is a phone and your camera! This is ideal for when you have a beautiful nature scene and you want to create a "mirror reflection" of it much like a still lake. This also has the added bonus of obscuring anyone in the way especially at popular tourist spots.

Use your mobile phone to do this and preferably remove your cover if it's a thick one. Make sure your screen is not lit up and hold it with the shortest side against the lens about 1/4 of the way up your lens. Tilt it up and down until a mirror image appears on your screen and reflects what you see in the lens. Magic!

Number 2: Frame your photo

Bring along fairy lights which you can wrap around the lens to create a glow. Or in a nature scene shoot amongst foliage or branches to create a natural frame. Try and get a frame that is sunlit.
Number 3: Get those light and star trails!

The Olympus OM-D E-M10 Mark III is an improved version of the Mark II with one significant feature ideally suited to those that love Astro Photography. It is the only camera to have this AP feature and instead of you having to stack individual photos, it does all the work for you.
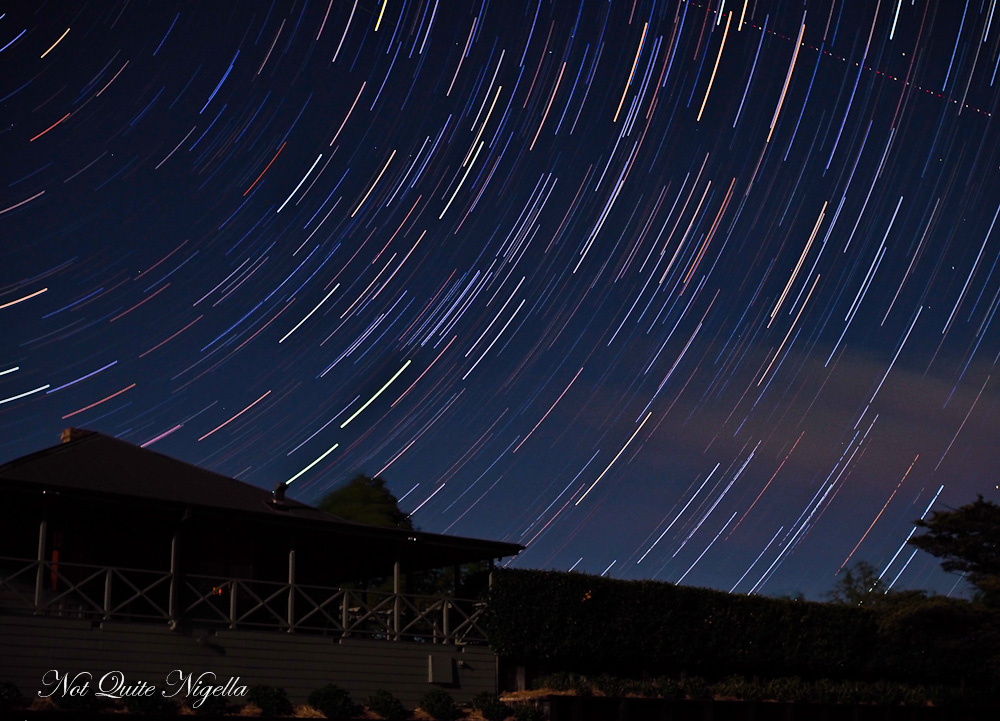
It's ridiculously simple. Put the camera on AP mode, press ok and tab across to "live comp". Focus on the main subject and click shutter, it will take photos every few seconds until you press the shutter button again and process. Press play to see your image. If you're in a remote area try a 30 minute to three hour star trail with a wide lens. The star trail above took just over 30 minutes to shoot and the camera took over 800 images and then stacked them together almost instantly ( I doubt I've have the patience to do that). If you're in the city where star trails can often be interrupted by planes flying overhead or light pollution, try a light trail. These are much quicker to do too.

Number 4: Zoom in
Look for textures among natural environments. Zoom in.
Number 5: Play with your white balance
Try shooting on sunny mode which creates a cooler tone while cloudy mode enhances the warmer tones in an image, particularly at sunrise or sunset.
Portrait Photography Tips by Rachel Devine
Number 1: How to get "Bokeh"

For photoblogger Rachel Devine the most frequently asked question is, "How do you make the background blurry?". That is the much sought after bokeh effect. There are a few tricks to getting bokeh in portraits. There are several components to achieve bokeh:
- Use a long lens-the longer the focal length the more out of focus the background will appear.
- Flat, front light
- Space or distance between you and the subject and the background.
- Wide aperture. Try to get the widest aperture possible while keeping your subject's face in focus.
Also you will need to pick the right setting to take a photo. We picked this avenue of trees in Centennial Park to take the photo of Mochi.
Number 2: Pose better
Want to pose better or get better portraits of people? Rachel uses a 75mm and 45mm for portraits. These longer lenses can produce blur but the Olympus OM-D E-M10 Mark III camera has 5-axis image stabilisation. The most flattering pose is front on with the light facing the subject. The skin appears smoother and there are less harsh shadows. The subject should lean forward. Use a long lens and a wide aperture (the photographer should stand between the subject and the window with the light source to the photographer's back). The larger the window, the softer the light. To create softer light, hang sheer white curtains over a window.

You can also use back light (where the subject is between the light source and the photographer). Use the lens hood to avoid flare. You can also use foam core boards to reflect light back into the subject.
And the hard truth? Children and young people photograph better. A camera compresses the features on a face and shortens the nose. It is less noticeable in children but adults will look broader. You know that old chestnut, "Camera adds 10 pounds"? It's right.
Number 3: Use the rule of thirds

The rule of thirds in the Wanaka Tree image. The bottom horizontal line is where the horizon lies and the item of interest, i.e. the tree, is framed where the lines cross
Use rule of thirds. The rule of thirds divides each image into 9 portions. If you can't visualise the grid, use the grid on the camera.


For a landscape image, you might place the horizon on the bottom horizontal line. The areas where the lines cross is where you want the focal point or most interesting part of the image to be.
Number 4: Tricks with kids and babies
One of Rachel's tricks when taking pics of babies is to put a sticker in a baby's hand and then ask the older one to help them take it off. It makes them appear as though they are holding hands. Also use stickers on the ground to help them stay in place.
Number 5: Post Editing
Photographers edit their photos using post software like Photoshop or Lightroom. I use Lightroom for post photographs as I find that easiest and it helps to find light where there is little (full disclosure: I'm absolutely hopeless at Photoshop but if you are good at that, use that).

Rachel recommends some editing apps so that you can edit images on the go using your phone. She recommends Mix by Camera 360 (skin smoothing, temperature adjustment, hue, saturation and lightness), Touch Retouch (to remove blemishes or people from the background and only 99c), Afterlight and Over (typography app).

Some recommendations from me:
Go low! Try a different perspective. It's amazing how much a photo can change if you get down and see it from a lower perspective.
Always have your camera ready. Sometimes you see something that is only available for a few seconds, particularly people. Part of the reason why I switched over my camera to the Olympus OM-D E-M10 series is because it fits in my handbag and is super light to carry. When I'm travelling I carry it on my shoulder.

If you're going to be in a view shot and you don't want to be the focus, be a small part of the picture. It's like fashion bogging without fashion blogging :)
So tell me Dear Reader, what do you like to take photographs of? Did you pick up any new tips? What sort of camera and lens do you use?
You can buy the Olympus OM-D E-M10 Mark III here. Anyone who purchases an Olympus OM-D or PEN camera can have a free 45 minute session with one of the Olympus team. To reserve a place visit their website: www.olympus.com.au/coffeewitholympus


Reader Comments
Loading comments...Add Comment