I have a hilarious friend, Buxom Wench, who is honest when she is telling me how it is.
When she first met me, she looked at me up and down and said "You look better in photographs, much better than you do in real life."
I had to laugh. I don't mind honesty when I know that the person from whom it comes isn't offering it from a malicious perspective and it is really just how they feel or think. Although considering I don't really like the way I look in photos, it made me wonder... Mr NQN is the same way, he is down to earth and at times, frustratingly honest. If I make something that needs improving he will tell me that in no uncertain terms and if something looks a bit silly, he will also tell me that. By way
of uncontrollable laughter.
I don't love that so much ;)
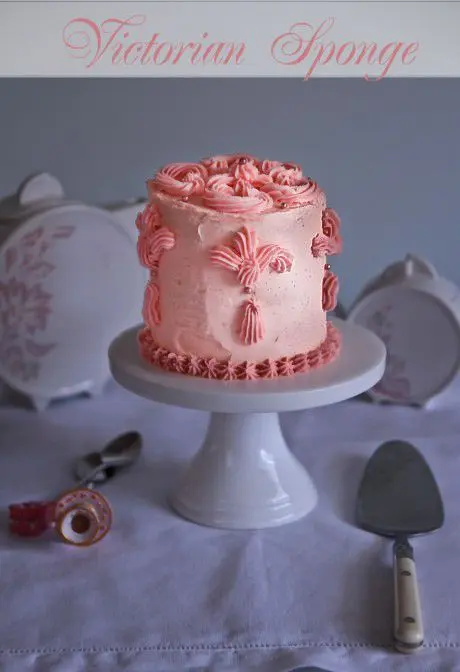
When I bought the new Peggy Porschen "Boutique Baking" book I quickly flicked through it and my gaze fell upon this Victoria Sponge cake decorated with pretty Victorian scrolls. It was so pink and girly that I fell instantly in love and went on to bake and decorate it, my enthusiasm unchecked with my abilities, well it's about effort isn't it? I showed Mr NQN the finished cake and he said "yeah, it looks ok" and then when I showed him Peggy's version his opinion wavered. "Oh right, yeah she's
really good isn't she?" giving my cake a pitying look and an unenviable cluck.
I immediately thought of mother's day for this cake as it was pretty but still light enough to have after a celebratory meal. The sponge that Peggy made was a Victorian sponge but because I still have a slight fear of sponge, I did my usual sponge cake instead. It is a duck egg sponge as I found myself with the fortune of having some duck eggs although you could use chicken eggs too.
Each of the two sponge cakes is split in two and brushed with sugar syrup to make them moist and they are then filled with strawberry jam and vanilla speckled buttercream. Before you know it, you're getting ready to sculpt and pipe Peggy Porschen style. I will preface this by saying that it isn't easy but it is not impossible and the cooler weather that we're experiencing in Sydney will help in that regard. I wouldn't try to do this in hot weather unless you have strong air conditioning. And if
your decorating efforts fall short of expectations, you needn't share this with anyone as it makes a small cake and one that you could eat on your own or with your mum. Mums tend to understand these sorts of things :)
Oh and I have some absolutely delightful news! I just found out last week that I am a finalist in the Sydney Writer's Centre Best Australian Blogs 2012 award! I did a happy dance as soon as I heard that-thank you so so much to everyone that nominated me. The other blog finalists are wonderfully talented and I am honoured to be part of the finalists. And there is just eight more days until the People's Choice
award closes. If you do have a spare moment, I would dearly love and appreciate it if you could vote for me there :) It is sort of like the blogging version of "The Voice" which I am currently addicted to :).
So tell me Dear Reader, do you like the way you look in photos and do you like being photographed? Have you perfected a photo ready pose? And I have to ask, are you watching The Voice and who is your favourite so far?
Pink Victorian Sponge
Did you make this recipe? Share your creations by tagging @notquitenigella on Instagram with the hashtag #notquitenigella
Makes a tall 10cm diameter sponge cake, for a regular, larger sized cake, double the recipe
Ingredients:
2 duck eggs (medium sized 420g are fine) or 5 large chicken eggs at room temperature
1/3 cup caster/superfine sugar
1/3 cup plain flour
1/4 cup custard powder
1 teaspoon baking powder
A little butter and flour to grease the tins
2 sponge tins or 2 springform tines in the same size
Filling:
6 tablespoons strawberry jam
Sugar syrup*
250g butter, softened
400g icing sugar, sifted
1 little pink food colouring (I used Americolor in 'Dusty Rose')
1/2 teaspoon vanilla bean paste
pink cachous or nonpareils
Buttering and flouring the pans and shaking off excess flour
Step 1 - Arrange oven rack so that it sits in the centre of the oven. Preheat oven to 180C/350F. Grease pans with butter and sift flour over butter and shake out excess flour. Whisk eggs and sugar on a medium high setting (I used setting #6 on the Kitchenaid) for about 8 minutes until it has turned very pale and very thick and has increased in volume to at least 3 times its original volume.
Step 2 - Meanwhile, sift the flour and custard powder three times. Each time, do it at a bit of a height and tap the side of the sieve with the heel of your hand or use your wrist to shake it back and forth (rather than pressing down on the flour with a spoon).
Step 3 - When the egg mixture is ready, ensure that the oven is at the correct temperature. Have everything ready as the timing is crucial now. Sift the flour into the mixture while someone else folds the mixture underneath. This helps to avoid the lumps. Use the up, down and under folding motion (do not stir). It folds easily and should be able to be incorporated easily. Quickly spoon it into the tins and bake in the centre row of the oven and bake for 15-20 minutes. It should spring back slightly
when touched and the edges should pull back from the tin.
Step 4 - Cool in the tins for 5 minutes and then remove from the tin gently and cool on a wire rack. You can wrap these in cling wrap once cool and decorate it the next day.
Step 5 - Slice off the tops of the sponge and for the middle layers you want the top and the bottom of the layers to not have any "crusts" or colour on them so trim the top and bottom for these too.
Step 6 - Make buttercream by beating the butter until smooth and then adding the icing sugar, food colouring and vanilla paste until it becomes a smooth, fluffy texture. You don't want this too stiff as it will be hard to pipe so add a teaspoon of milk if you need to (although the ratio of butter to icing sugar ensures that it isn't too stiff).
Step 7 - Place the sponge cake on a turntable (I don't have one so I did it directly onto the cake stand) and brush generously with the sugar syrup to keep it moist and spread with some of the buttercream or the jam-even though I did one layer of jam and two of buttercream I would recommend doing it the other way around as the jam has a great flavour and you already have a lot of buttercream.
Step 8 - Top with another layer and spread this with jam or buttercream (alternate the fillings). Repeat until you have a stack of cakes sandwiched together.
Step 9 - Make the crumb coat which is to catch all the stray crumbs in a layer. Spread a thin layer of buttercream on the top and sides of the cake. You should not make this too thick and you should be able to see the crumbs through this layer. Using a metal icing scraper (I used a dough cutter because I don't have a metal icing scraper but the dough scraper isn't perfect) scrape the sides of the cake (this is where a turntable would really come in handy). The better the crumb coat, the better the
shape of the final cake. Refrigerate for one hour.
Step 10 - Spread more buttercream for the final coating and using a clean metal scraper make sure that the sides are as smooth as possible.
Step 11 - OK it's not perfect but it will do. Refrigerate for an hour (this helps set the buttercream and if you make a mistake with the next step, it is possible to quickly remove any piped buttercream errors. Tint the rest of the buttercream a smidgen darker with the dusty rose food colouring and place in a piping bag with a medium sized star nozzle fitted to it.
Step 12 - Pipe Victorian scrolls on top and other patterns (you can really do whatever pattern you like). Then on the sides, pipe the fleur de lys pattern starting from the wider end of the piping pattern. This is much easier if you practice this beforehand as it is hard to do. Pipe around the base too if desired. Use pink cachous or nonpareils between the fleur de lys and on top.
Pink Victorian Scroll Sponge was written by Lorraine Elliott and published on Tuesday, May 1, 2012 in
Delicious Recipes and
Cake Recipes.


Reader Comments
Loading comments...Add Comment