
It's birthday season in the Elliott family. I think I've mentioned in the past that birthdays were something that the Elliotts didn't do very well, particularly while the kids were growing up. Mr NQN and his siblings were given all sorts of strange items, usually picked up from around the house. Indeed one year, Mr NQN's brother was given an item he actually owned, a rusty clamp dragged in from under the house, ceremoniously wrapped in newspaper.
Nowadays they do try a bit more although there was the Christmas where Mr NQN's mum Tuulikki gave Mr NQN a bottle of Domestos, some Ajax and a toilet brush. Another year for my birthday, I received one quarter of a birthday card. That is, the top quarter of a regular sized card. There it was, measuring 3 inches across and 1 inch down with the top of a palm tree which made very little sense to me until I realised that they'd sliced off the top quarter of a regular card. We never asked Mr NQN's sister Amaya and her husband Laporello why they did it although we were quite curious. I was really hoping that I would get the rest of the card in three parts over the next three years and that there was some sort of puzzle or fascinating intention behind it.

The baking of the birthday cakes usually goes to me and I'm usually happy to do this. One of the upcoming birthday cake recipients this month is Laporello who is a graphic designer. For his cake, I decided to combine this month's Daring Baker's challenge, a Battenberg cake with something artistic and graphic so I made him a Mondrian patterned Battenberg cake. The cake was chosen as June's challenge because of the Queen's jubilee. It was originally created to celebrate the marriage of Queen Victorias granddaughter, Princess Victoria, to husband Prince Louis of Battenberg and is essentially an almond flavoured sponge cake that displays a chequerboard pattern once cut open.

The easiest part was the actual baking of the cake which I thought would be the hardest. The recipe was clear and showed how to make a regular square cake tin into a Battenberg cake tin with just the use of foil and baking parchment. A little too eagerly I sliced up the cake while it was still warm and delicate and then proceeded to make the chocolate plastique covering. This looked promising but I ended up with a hard disaster unable to knead it into modelling chocolate. Instead, I decided to do make a chocolate ganache and smooth the edges. Okay, it might look a bit makeshift but somehow white fondant or marzipan might not look as good as a dark border.

One of the least attractive things ever to grace the blog ;) Chocolate plastique gone wild, or more accurately, gone stubborn and stiff
Crash thud
If you were outside my door this Monday around 3pm you would have heard that sound. The sound of disaster as the camera tripod head came loose from its fixture and came crashing to the ground smashing my only two black plates to pieces. Small mercy was that the head narrowly missed the Mondrian Battenberg cake that I had spent the better part of the day making and assembling. I sighed picking up the plate pieces and throwing away the rock-like chocolate plastique. Some days are just not made for baking. Or for operating heavy machinery or even light machinery. Thankfully the Battenberg cake was spared and I wouldn't be stuck giving him a smashed in cake or perhaps more suitably, a quarter of a cake ;)
So tell me Dear Reader, do you make the cakes for your families and friends? And do you look forward to or dread this (or both, like me? ;) ). Do you tailor the cakes to suit the recipient?

Blog-checking lines:
Mandy of What The Fruitcake?! came to our rescue last minute to present us with the Battenberg Cake challenge! She highlighted Mary Berrys techniques and recipes to allow us to create this unique little cake with ease.

Mondrian Battenberg Cake
Ingredients
-
¾ cup (1½ sticks) 175gm / 6 oz Unsalted Butter, softened & cut in cubes
-
¾ cup / 175gm / 6 oz Caster Sugar
-
1¼ cups / 175gm / 6 oz Self-Raising Flour
-
3 Large Eggs, room temp
-
½ cup / 65gm/ 2 1/3 oz Ground Almonds (Can be substituted with ground rice)
-
3/4 tsp / 3½ gm Baking Powder
-
½ tsp / 2½ ml Vanilla Extract
-
1/4 tsp (1¼ ml) Almond Extract
-
Red, yellow and blue Food Colouring, paste, liquid or gel
To Finish
-
375 dark chocolate
-
4 tablespoons pure cream
Directions:
Step 1 - Preheat oven to moderate 350°F/180°C/160°C Fan Assisted/Gas Mark 4.
Step 2 - Grease an 8/20cm square baking tin with butter.

Step 3 - Generously spray a tin with cooking oil or brush with butter. Take three pieces of foil and fold it over twice so that it can sit up by itself. Trim each piece to fit the length of the tin. Then take three pieces of parchment paper and fold each in half and place the foil in the divide. Place as shown above so that the foil sits up and the parchment lines the base. You need to make four divisions in this tin, the largest for the plain or cream coloured batter. Also place some parchment on any gaps and on the sides that aren't covered.
Step 4 - OR Prepare Battenberg tin by brushing the tin with melted butter and flouring.
Step 5 - In the bowl of an electric mixer fitted with a whisk attachment, whisk together the dry ingredients then combine with the butter and eggs and beat together just until the ingredients are combined and the batter is smooth.

Step 6 - Spoon a third of the mixture into the one side of the prepared baking tin.


Step 7 - Divide the remaining batter into three and place each in a separate bowl and tint them with the colours-be generous with the colours. Stir until the colour is thoroughly distributed, add more colour if needed
Step 8 - Spoon each batter into the cavities of the prepared baking tin.
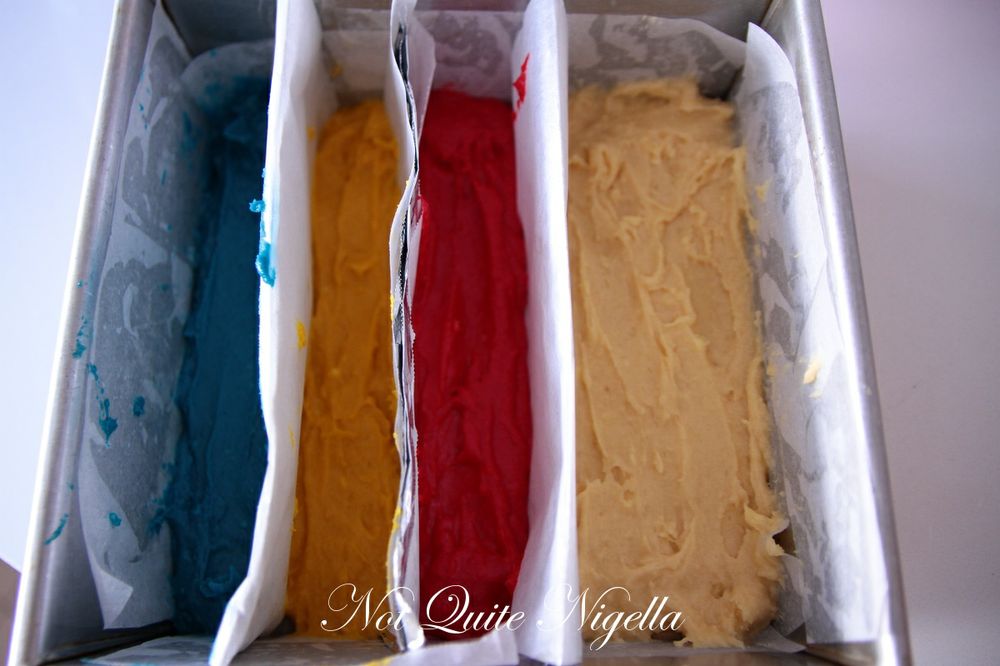
Step 9 - Smooth the surface of the batter with a spatula, making sure batter is in each corner.
Step 10 - Bake for 30-35 mins until the cake is well risen, springs back when lightly touched and a toothpick comes out clean (it should shrink away from the sides of the pan).

Step 11 - Leave to cool in the tin for a few minutes before turning out to cool thoroughly on a wire rack
Step 12 - Once completely cool, trim the edges of the cake with a long serrated knife
Step 13 - Trim the sponges. It helps enormously if you use a Mondrian pattern as a guide which really helps when cutting up your sponges.

Step 14 - Neaten the strips and trim as necessary so that your checkered pattern is as neat and even as possible. Put them against each other so that you can see what it will look like.

Step 15 - Make the chocolate ganache by melting the chocolate in a double boiler or in a microwave and adding the cream. Stir until smooth.
Step 16 - Using an angled spatula, spread the ganache over the cake pieces to adhere them to each other. If your ganache looks like it is setting, place it in the microwave on 50% for 20 seconds to loosen it up again and keep reapplying. Then, spread the ganache over the top and sides.

Step 17 - Using a cup of warm water and a clean angled spatula, you can smooth the ganache by dipping the spatula into the water, shaking the water off and then applying firm but gently pressure buffing out any lines or creases.


Reader Comments
Loading comments...Add Comment