Recipe: Vintage Marie Antoinette Cake Recipe »
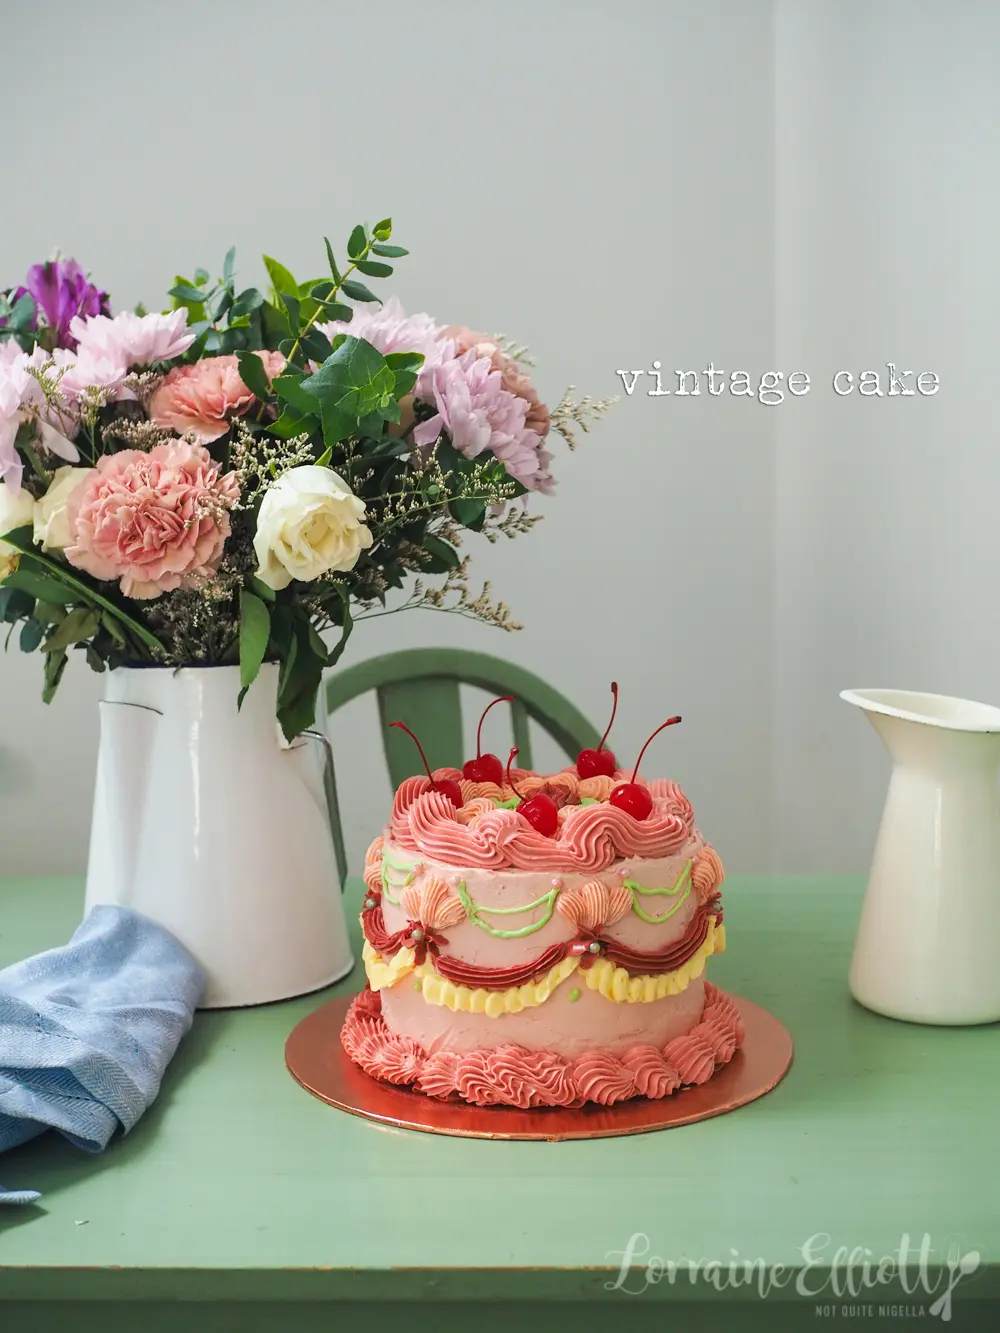
Vintage, pastel-adorned and piled high with buttercream swirls and frills, this Marie Antoinette‑style cake is unashamedly feminine and almost too pretty to cut. It's as delicious as it is showy - perfect for Mother's Day or any special occasion where you want to make an impact. I called her Marie, of course.
The first time I saw a vintage cake I was blown away by the prettiness of the cake. Once you make one Vintage or Marie Antoinette Cakes they become a bit of an addiction. As soon as I made this one, I started of thinking up people who might want a vintage cake for their birthday. You can decorate it with your favourite colours and use which cake flavour you want inside.

Tips for Making Vintage Cakes:
1 - This cake uses a lot of piping bags and tips. I used Loyal biodegradable piping bags.
2 - The tips you will use are the following:
867 or 6B (large French star tip) for the shell details at the bottom and outer edge of the top
2D (star, rosette tip) for the red star blossoms
104 (small petal tip) for the vanilla or cream ruffles
32 (small open star tip) for the pink fleur de lys and red banners on top of the ruffles
3 (small round tip) for the green lines.

3 - As I said you can design it to any colours that you'd like. I would recommend having 3-4 colours in your vintage cake including a plain white buttercream.
4 - Before you start anything clear out some room in your fridge to keep your cake in because the fridge will be your best friend with this cake as it will be where you store your cake to set each layer which makes it easier to work with, especially if you make a mistake. If you pipe fresh buttercream onto set buttercream and make a mistake you can lift it off if the layer or detail below is set firm. I often bake cakes on Fridays because the fridge is emptiest then.
5 - The decoration is the fun bit-if you like the decorating there's no reason why you couldn't use a bought sponge or double decker cake for this. The recipe below is for a vanilla butter cake and we add black cherry jam and cream in the filling.
6 - If you want to have a cake that can keep outside of the fridge, switch the jam and cream filling to a buttercream filling (be sure to make more buttercream). I just don't like that much buttercream in a cake.
7 - The quantity will make more buttercream than you will need for piping and frosting because there's nothing worse in cake decorating than running out of frosting. This buttercream is a super smooth buttercream that pipes like a dream, doesn't crust over and is wonderful to work with. It is a very different buttercream from the classic American buttercream which is more about sugar, this has more butter than sugar in it.

This is a great cake for Mother's Day or for when you want to make an impact. It's definitely a special occasion cake and one that we intended to serve at a dinner to celebrate both Mother's Day and my birthday. My parents are moving overseas to Singapore permanently and they had booked tickets to leave a few days before my birthday and we were headed overseas for my birthday too. We had arranged to have dinner 10 days before this; we decided that 10 days seemed like a good amount of time because that way you'd have time to recover from COVID and undergo the 7 day isolation.
But then fate intervened. A couple of nights before our dinner Mr NQN and I had been out with a couple we are close friends with. Two days later we got a message that he had tested positive during a routine work test. As soon as I told Mr NQN that his friend had tested positive he immediately started to feel symptoms. "I'm not feeling great actually," he said and almost crumpled in a pile in front of me. I wasn't sure if he was joking or being dramatic but then we decided to separate in different areas of the house just in case while we awaited our test results. Our plans to go out to dinner and have this vintage Marie Antoinette cake were cancelled as we weren't able to get results in time. We did get some good news and that we both tested negative but my birthday and Mother's Day celebrations were postponed indefinitely and we have a tonne of cake to eat too which is either a good or bad thing!
So tell me Dear Reader, do you bunker down for a period before you travel? What are you doing on Mother's Day? Do you like vintage style cakes?


Reader Comments
Loading comments...Add Comment