If you do want to make your very own armadillo cake, here is a recipe with the cake recipe included. Decorating the cake took me two and a half hours to make it into an armadillo and that included the one hour in the fridge so it's not that cumbersome. I have to admit that this wasn't just gory and decorative, the cake itself was very popular. Mr NQN took the leftovers to work where he reports that it was quickly devoured and people murmured their appreciation at the party about the moistness and flavour of the cake. Best of all was that even two weeks after, with the cake covered and all, it was still not in the slightest bit dry.
I know that Halloween is not the most tasteful celebration and people that are obsessed with pretty things may curl their lip into a sneer at the grotesque offerings. Pus, slime, zombies, ooze and gore prevail and it's all on the borderline of taste and humour. You never know how people will react although my friends and family are well versed in my love for the macabre.
But then there are my in laws who are as predictable unpredictable as you can imagine. My mother in law Tuulikki was born a vegetarian with vegetarian parents which at the time was not that common. When I asked her to illustrate my book, she agreed but one drawing would prove to be a challenge. You see I wrote about my obsession for the red velvet armadillo cake first sighted in the film Steel Magnolias. It's actually a traditional cake in the South of America for the groom. Said to be a British tradition that has been forgotten in England, it is now part of American tradition. It can often take the form of various objects that the groom chooses. In Steel Magnolias, the fact that the cake was a) shaped like an armadillo and b) was made out of red velvet made me absolutely besotted by the very idea.
However Tuulikki didn't want to draw the cake on a plate as she didn't want the armadillo to look like food. I eventually persuaded her after several discussions and told her that it was an armadillo cake and not an actual armadillo. Incidentally, this whole conversation repeated itself when she came to draw a Peking duck. But I assured her that drawing an animal as a meal was nothing like killing and eating one.
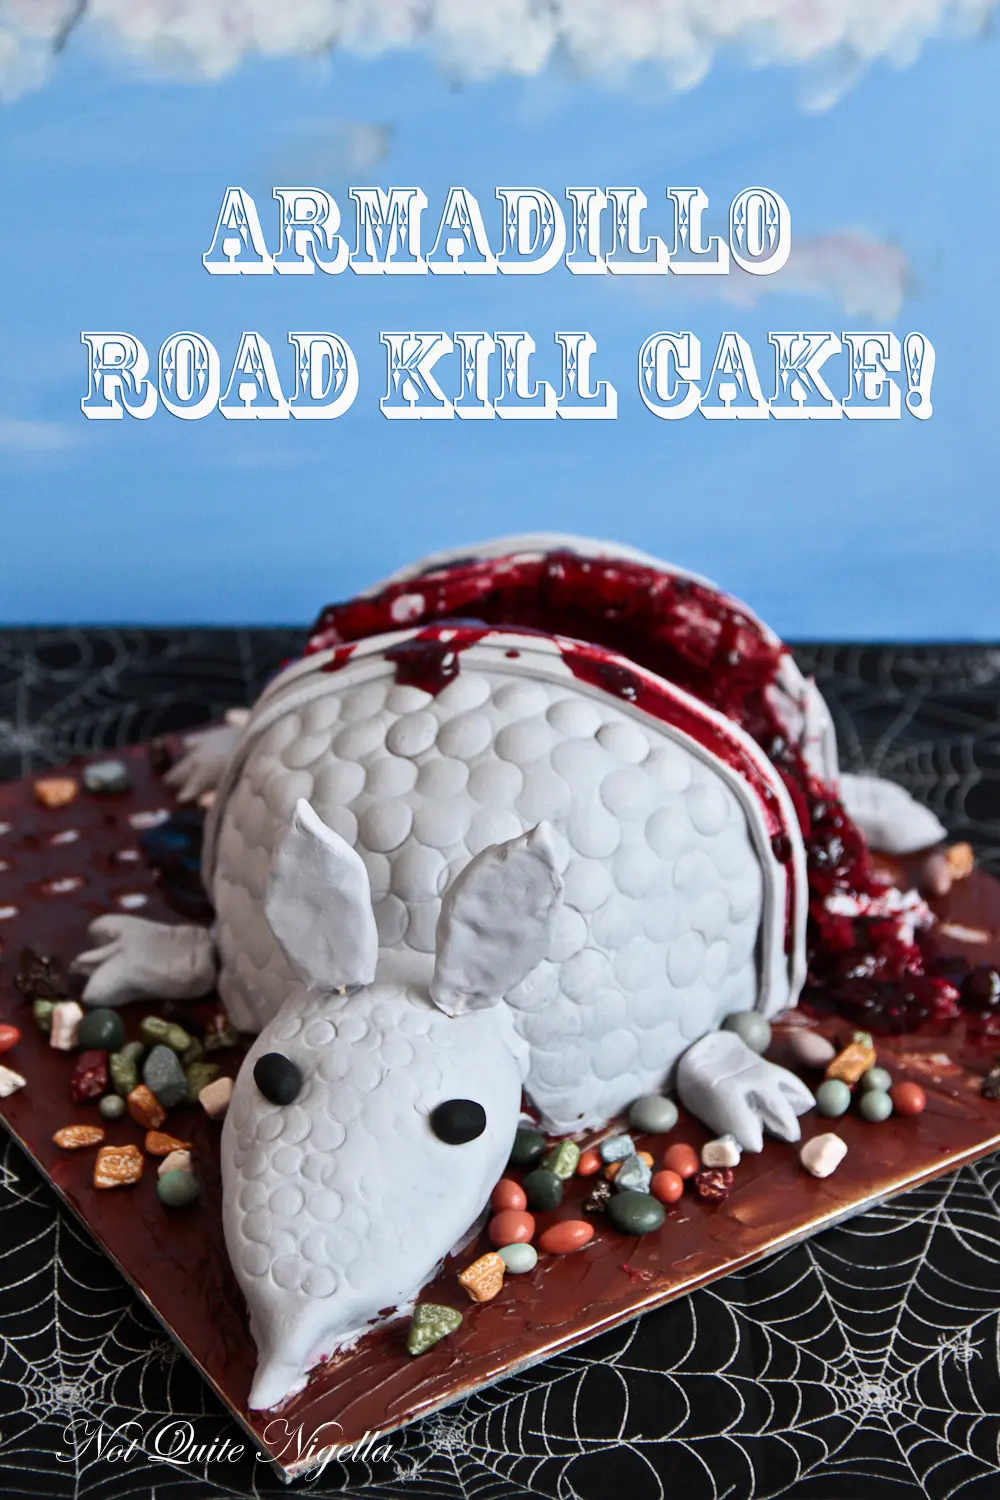
In any case, when I decided to make an armadillo cake for Hallowe'en, I wasn't sure how she was going to react. Because not only was it going to be an armadillo red velvet cake but in the spirit of all that is gruesome and ghastly, it was going to be an armadillo road kill cake. It looked suitably gory with all of the red candy string spilling out of it and cherry jam.
At the party I didn't draw her attention to it but she came up to me part way through the evening.
"Lorraine, I really like what you've done to the armadillo cake" she cried in her sing song Finnish accent.
"Errm, did you see it on its side?" I asked her, figuring that she has just seen it front one, without the guts and tyre marks.
"Oh yes, it is WONDERFUL!" she said her hands outstretched in excitement.
I was completely befuddled. "I don't understand, you didn't even want to draw one as a cake for the book. But the one with the guts is ok?"
"Oh did I? I don't remember!" she said gaily, laughing and moving along.
See, predictably unpredictable!
But perhaps a little of Tuulikki has rubbed off on me. I found it hard to cut into my little armadillo friend. I perhaps made the fatal mistake of naming it Mr Turtle Rabbit (based on the original Aztec name of "Azotochtli"). But in the end Halloween prevailed!
So tell me Dear Reader, do you prefer a corner piece with more icing or a centre piece? And this is a cheeky gross one, but would you ever eat actual roadkill? ;)
Armadillo Red Velvet Cake
Did you make this recipe? Share your creations by tagging @notquitenigella on Instagram with the hashtag #notquitenigella
Rated 5 out
of 5 by
7 lovely
readers. Share your rating:
660g/23.3ozs. butter (doesn't matter if it's at room temp or not in this recipe)
480g/17ozs. white chocolate broken up into pieces
4 cups caster or superfine sugar
4 cup water
Red Velvet colouring (4 tablespoon of the LorAnn one plus 2 tablespoons regular liquid just for good luck)
4 cups plain flour
1 cup cornflour or cornstarch
2 teaspoons baking powder
4 tablespoon cocoa powder
4 eggs, lightly beaten
300g/10.6ozs. white chocolate
1/2 cup cream
1 tablespoon LorAnn Red Velvet food colouring gel*
To decorate
750g/26.5ozs. White fondant
A little black fondant for eyes
Black food colouring
2 rice paper sheets
2 toothpicks
2/3 cup cherry jam mixed with 1 tablespoon red food colouring
Red string candy (for guts)
100g/3.5ozs. dark chocolate
Pebble shaped candy (or chocolate cookie crumbs) for dirt
*The Lorann Red Velvet food colouring gel is thicker and very strong than liquid red colouring. It is also ideal for melting with chocolate as liquid red food colouring may cause melted chocolate to seize. You can purchase it at Glasshouse Cakes and Supplies in Revesby for $14.95 a bottle.
Step 1 - Preheat oven to 150c/300F. Line two 8x8 inch square baking tins with parchment.
Step 2 - Place butter, chocolate, sugar and the water in large saucepan over low heat until melted and combined. Cool for 15 minutes. Whisk in both red food colourings.
Step 3 - Using a whisk, add flour, cornflour, cocoa, baking powder and then eggs. This is a huge batter mix so make sure to get the bits of flour at the bottom.
Step 4 - Bake for 1 hour and then cover with foil and bake for another 30-40 minutes or until a skewer inserted comes out clean. Cool in tin. Once cold, cover with cling film.
Step 5 - Make chocolate ganache by melting the white chocolate in a microwave or over a double boiler. Mix the food colouring gel with the cream whisking until it becomes a uniform red colour and add to the melted white chocolate. If you don't have a gel and only liquid red food colouring, I'd leave the ganache white as it may seize if you add the liquid colouring as it is too much like water which causes chocolate to seize. Heat if it becomes too stiff and unworkable.
Step 6 - Trim the cakes and discard any crusted over bits. You can always use the excess cake for cake pops.
Trimming the cake
Spreading some ganache to adhere the cake to the cake board
Step 7 - Now comes the tricky part-carving the armadillo. Take your cake board (for a heavy cake, make sure it's one of those really thick ones and not the less expensive, slightly flimsier ones) and spread a little ganache on it to secure the cakes to it. The ganache will act as a glue and filler. Sandwich the two cakes together with some ganache. Allow to set.
Using ganache to glue together the two halves
The cake ready to carve
Step 8 - Take a knife and start carving at the cake. A skilled person could probably do this with one cake but I am not that skilled person. You want a rounded football shape from the top. Make sure that there are no hard corners, it should be smooth. It helps if you have a few pictures at different angles of armadillos.
From the top down, actually an armadillo is longer but I couldn't find a long cake board
Adding the head
*Spreading ganache on the surface-this will be smoothed down to provide a smooth surface for the fondant *
Step 9 - Spread ganache on top of the armadillo. It doesn't need to be neat and smooth at this point. Place in the fridge to firm up for an hour or so.
Folding over the rice paper into four long rectangles
With the toothpick in, cutting out the ear shape before covering with fondant
Meanwhile, make the ears. Lightly mist a sheet or rice paper with water and fold up into four quarters lengthwise to get a long rectangle. Stick a toothpick in the bottom of one and press down. Cut an ear shape out with scissors.
After smoothing with the palette knife, the surface is much more even
Step 10 - Smooth the ganache. Have a glass of water and a palette knife and dip the knife in the water and smooth the ganache. Press it firmly and it will smooth out. This takes practice so don't worry if you don't get it straight away.
Step 11 - Tint the fondant with a little black food colouring. I did this in the mixer with a dough hook as it was a large amount of fondant.
Cutting out the armour
Step 12 - Roll out the fondant onto a large, clean area and use cornstarch or cornflour or even sifted icing sugar to prevent it from sticking. Gently lift the round of grey fondant onto the cake and using a sharp paring knife, cut off any excess and tucking any bits in underneath it. Smooth it down with a square of overhead projector film. Make sure to cover up any excess fondant up as it dries quickly.
The armour stripes completed
Step 13 - Cover the head and ears with the fondant. Roll out some more fondant and make the armour plates which are just long, thin strips of fondant. Adhere these to the armadillo using a little water.
Covering the head with fondant
Step 14 - Make a tail by rolling a sausage of fondant thinning it out at the end. Then fashion little paws out of the fondant cutting the pieces with scissors to make the paw shape.
Making the tail
Using a piping tip to make the scales
Step 15 - Take the end of a piping tip and draw armour scales on the armadillo. Shape two small balls of black fondant and adhere these as eyes. Once the fondant on the ears has set, attach the ears. You now have an armadillo!
Shaping the paws
Cutting out the claws
Step 16 - To make a road kill version, just cut a one inch slice in the middle of the armadillo and squash down the cake spreading the armadillo halves slightly apart. Remove any excess grey fondant as you mostly want the red velvet "guts". Line with the red string candy and spoon the cherry jam over and near the "wound".
Making some not so great tyre tracks
Step 17 - Cover the silver board with melted dark chocolate. Use the palette knife to make out some tyre marks. Apparently you can also use a toy truck to make these imprints but I couldn't really find one large enough. Cover with cookie crumbs or pebble candy to simulate road terrain.


Reader Comments
Loading comments...Add Comment