Alice and me. Alice in Wonderland that is. It's enough to get a girl excited for today I'm making Alice in Wonderland cupcakes with Planet cakewho hold regular classes in cake and cupcake decorating. I'd heard of the classes and seen many gorgeous results including my buddy's Christie's Easter cupcakes. This class would be their first Alice in Wonderland cupcakes class and they were designed by Anna Maria Roche. Mother of two boys Roche is originally from Austria where she learnt her trade as a pastry chef but whilst Austria is known for cakes, it is not known for cake decorating in this style. When she moved here in 1991, they had to make their own ready to roll icing (RTR icing aka fondant) and cake decorating wasn't anywhere near as prolific as it is now. As for me, I was just happy to be able to learn some more cupcake decorating tips!
My Alice in Wonderland cupcakes...
What can I say...I see things in technicolour!
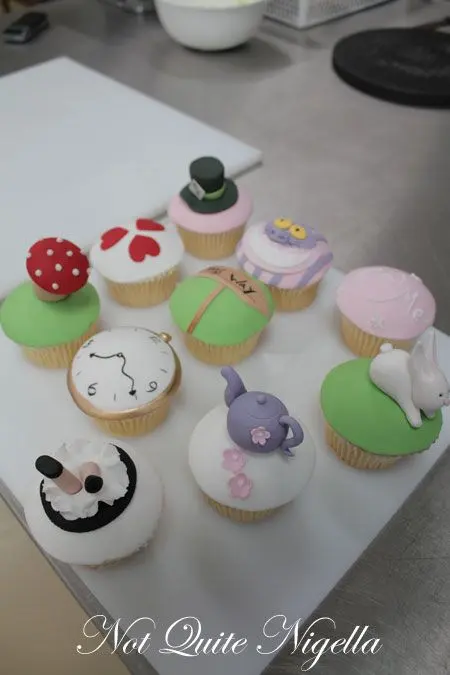
We take a peek at the designs we're doing today and I already spot a few favourites. We're making an Alice down the rabbit hole, a teapot, a mushroom, a misleading sign, Mad Hatter's hat, a cheshire cat, a clock and a rabbit. We'd be making two of each designs and the purely doing the decoration. The cupcakes are made by an external bakery for Planet Cake as all of the time needed to complete all of the designs. I was excited, I was only a novice cupcake decorator and skill levels at this class varied from first timers like me to a someone who was on her seventh Planet Cake class!
The equipment
_
_
Our workbench
Two of us share a large stainless steel workbench and in the corner are our sets with the tools of the trade. We are given a plastic ruler, a frilling tool, a turntable, a small paring knife, a small offset palette knife, a vinyl sheet and a small rectangle of acrylic much like an overhead projector sheet, a sifter of cornflour, a pizza cutter and a small rolling pin.
Ganaching the cupcakes-the one on the left has been smoothed over and the rest have a rough application of ganache
The first thing we do is ganache the tops of the vanilla cupcakes. This is to give them flavour and keep them moist as well as allow for a smooth surface for the ready to roll fondant. We first rough ice them and then using our palette knife dipped in hot water and gently tapped on a chux, we smooth it over so that the icing reaches the edge of the cupcake cup to create a perfect dome. If a cupcake has overflowed slightly, trim the cupcake with the paring knife.
Slicing off any overhanging cake to give a smooth rounded surface
Icing the board using the transparency film
We then ice a 16 inch board with fondant by rolling it out. This is for later once the cupcakes are finished and we will adhere them to the board using ganache and then place them on the board to transport home in a box (and it's a large box, I caught a cab home!). We go through how to mix fondant colours - don't worry I'll go through this later, they're great tips ;) . All of the fondant that we use today has already been coloured for us. Interestingly, Planet Cake use slightly different
formulas for the RTR icing during Summer and Winter as it needs to be slightly firmer during the Summer heat and slightly softer during the cold Winter months.
My what bright colours you have!
My bench mate Katherine and I team up to cut out the fondant colours to top our cupcakes. Luckily we both want bright, vivid shades and we do bright purple, green, blue, fuchsia, orange and green as well as leaving two for our white clock.
We then break for lunch which consists of salads and wraps as well as juice and there are cakes, tea, coffee and water that we can help ourselves to during the day.
Rabbit parts
Making the hat brim
We then learn how to make the teapot and the rabbit. Anna Maria then she shows us how to make the Mad Hatter's hat brim using a pasta cutter which helps to achieve an even level of thinness and she makes the body of the hat using an acrylic smoothing tool. Our next one is the toadstool and after that is my favourite: Alice falling down the rabbit hole (which I promise I'll show you how to make step by step, it's so brilliant!).
Shaping the hat using acrylic smoothing tools
Brushing the wood grain effect on the signs
We're then showed how to make the signs which are made using a dry brush and brown liquid colouring (ensure that you stipple it first to avoid too much colouring on the brush) and then a rather detailed cheshire cat whose stripes are made using a pasta maker.
Cheshire cat
Cheshire cat smile
Painting the gold rim around the clock
My favourite bit is next and that is the painting and we paint the edge of the clock gold, draw numbers on the clock, the shoes on Alice and the text on the signs. Before we know it, it's 4:30pm our creations are finished and everyone's look fantastic without exception!
Everyone's completed cupcakes
The Top 10 tips for cupcake decorating:
Did you make this recipe? Share your creations by tagging @notquitenigella on Instagram with the hashtag #notquitenigella
And I did promise you that I'd share the top 10 tips I learnt from the day so here goes!
Step 1 - If you're kneading a lot of fondant (over 500grams or 1 pound) use your shoulders and body weight to do this and stand over the fondant. As a shorty (155cms tall, petite is such a nicer term for it ;) ) I was given a stool and it helped enormously. It also helped me roll the fondant evenly.
Step 2 - French rolling pins are all very pretty but they're not ideal for rolling large amounts of fondant. A regular one where the body spins is best as it does most of the work for you. Press down the fondant into a square shape and then roll 6 times in one direction and then turn it 90 degrees and roll it another 6 times until you make a square. Keep doing this until the desired thickness is required.
Kneading fondant
Press down to flatten fondant before rolling
Step 3 - To roll fondant ready for use, you want to knead it in order to get one surface (on the table) as smooth-the other surface can have lines. You will of course use the smooth surface on top. Use a shaker of cornflour to ensure that the fondant doesn't stick to the table. If it does, use a paring knife quickly and carefully under the fondant to undercut it.
Colouring fondant
Step 4 - To colour fondant, first pinch off a golf ball sized roll of fondant. Take a fingernail sized amount of colouring gel (they use Wilton gel) and wearing disposable gloves knead it into this ball. It will still be glossy with gel on the outside but you can store this colour ball and use it for later. Pinch off a small amount from the colour ball and knead it into a larger amount of white fondant. Knead it like dough (in circles) and then slice it in half-you can see that there are streaks
throughout it. Then re-knead it and cut again and repeat until there are no more streaks inside.
Kneading the colour ball into the white fondant
Slicing the fondant in the centre revealing the streak patterns from kneading
Step 5 - Make coloured fondant 1-2 days days before you need to use it as it will fade or use it straight away. Purples are particularly susceptible to fading as are some pale pinks (which can turn white).
_The teapot on the right was made previously and has faded slightly whereas the one of the left was freshly shaped and slightly glossy
_
Step 6 - Always work fondant in your hands if you are modelling so that it gets slightly warm. It is much easier to adhere it to other parts of fondant (eg. the teapot spout to the body) and it should be slightly glossy when it is ready.
_Making the pear shape: make use of the natural groove in your palms-the ball end will be in the centre of your palm while the thinner tapered end will be closer to your wrist.
_
Place a perfectly round ball of fondant in thegroove and roll
Which will produce a pear shaped piece of fondant
Step 7 - If you are modelling figures with fondant always start with a perfectly round ball with no cracks or lines. A very common modelling technique is the one we used for the rabbit which produces a teardrop. This is where fondant is rolled between the grooves of your palm back and forth to produce the teardrop shape.
Covering fondant between uses
Step 8 - Cover fondant when not in use as it dries very quickly. You can use vinyl tarp for this - it doesn't need to be anything special.
Step 9 - If you are decorating large quantities of cupcakes, the best way to measure fondant is to make a sausage shape, cut one slice off and weigh it and if it is correct, slice off pieces in the same size to avoid individual weighing.
Step 10 - Essential bits of equipment are: plastic ruler, a frilling tool (although some use a toothpick which is quite fiddly but would do the job), a small paring knife, a small offset palette knife, a vinyl sheet and a small rectangle of acrylic much like what overhead projector sheet, a sifter of cornflour, a pizza cutter and a small rolling pin.
Even though I thought I knew a bit about cupcake decorating, I found that I learnt a lot. It was also very inspirational and motivational and I came out out there wanting to buy paints, gold dust and more fondant to create even more cupcakes ( much to Mr NQN's dismay when he sees the bill for cake decorating supplies!).
Alice Falling Down The Rabbit Hole Cupcakes
And I did promise you some Alice in Wonderland Cupcakes didn't I? Here is a step by step tutorial for making the fabulous Alice falling down the rabbit hole cupcake.
Step 1 - Make the layers of the skirt. Using a chrysanthemum cutter cut two white discs and one blue disc. Using a frilling tool, frill the edges by rocking back and forth with the blunter end of the frilling tool. This can also be achieved using a toothpick.
Step 2 - Roll out a small sausage in a flesh coloured fondant (about 7 cms in length)
Step 3 - Pinch both ends to make feet. Cut in the centre. You have two legs! We were all absolutely floored by the adorable doll legs :)
Step 4 - Place a large black disc of fondant on top of an iced cupcake using a little water on a small paintbrush to fix it. Place frilled blue disc first using a small amount of water.
Step 5 - Add both white frilled discs and adhere with a little water.
Step 6 - Poke two holes quite deep with the frilling tool to insert the legs.
Step 7 - And pop the legs in! Paint the feet back to simulate shoes.
Oh Alice!
And eat eagerly knowing that you have 19 other cupcakes to devour :)
NQN attended the Alice in Wonderland Cupcake Class as a guest of Planet Cake.


Reader Comments
Loading comments...Add Comment