Welcome to our Vintage Christmas!

Welcome to our Vintage Christmas!

I was having dinner with my friend Mystery Guy one evening when he regaled me with a story that had me bent over in laughter. At him, of course. He had signed up to a neighbourhood martial arts school after being beseeched by a door knock appeal. Arriving at the studio, he surveyed the crowd of potential class mates and combatants. There was a man in crisp white martial arts gear kicking and slicing the air with his hands and a crowd of small kids. Everyone looked at each other warily because they knew that they'd be paired up and you didn't want to go for the man in the white who was clearly more advanced.

christmas dinner

christmas dinner

Mummy turkey

A young boy near Mystery Guy was doing the same. The young lad surveyed the crowd, saw the man in white, saw the gaggle of young kids and his eyes settled on Mystery Guy standing nearby him. He pointed at Mystery Guy and said "Mummy, he looks weak!" The mother, mortified at the insult to Mystery Guy told the child that he could "clock him if he wanted to" but the damage was done to Mystery Guy's ego. "This child had ascertained that I was the weakest out of everyone, children included", he said to me while I was laughing with tears in my eyes.

christmas dinner

Peppermint Iced Chocolate

Picking the perceived low hanging fruit is common in human nature. After all, the idea of expending the least effort for a gain is appealing. I decided this year for Christmas, I would do something similar to that. The first item I decided to choose was the turkey after seeing it on Angela's blog Spinach Tiger. It was a turkey that didn't need any basting at all through an ingenious method of cooking it which still left it tender, golden and utterly delicious. After that, the rest of the food seemed quite easy. It was all in the vintage theme of Christmas with traditional turkey accompaniments and the dessert was a chocolate peppermint cake based on a vintage snow globe design.

christmas dinner

Home made cranberry sauce

And in the spirit of vintage, home made cranberry sauce. Way back before cranberry sauce came in a jar!

christmas dinner

Hasselback Potatoes

Although we never grew up eating potatoes, I seem to have developed some sort of odd knack for cooking potatoes. A friend once said "you're known for your potatoes" which seemed as random as hearing that I was known for a rounded bottom - just totally out of the blue. Anyway, I feel the need to do potatoes all the time now after hearing that (and how embarrassing if she were only being polite!).

christmas dinner

Pan buttered rice

One thing that I grew up eating was rice. I wasn't sure what my father would say to what I thought might be a travesty to his plain steamed white rice but he gave this a thumbs up. And my father never gives thumbs up. In fact I never knew he had thumbs they were used so sparingly :P

christmas dinner

Sweetcorn coleslaw

Coleslaw is a staple in our fridge and there's no such thing as too much crunchy, healthy salad. We served two at Christmas dinner, a regular sort of sweetcorn coleslaw...

christmas dinner

Wedge Salad

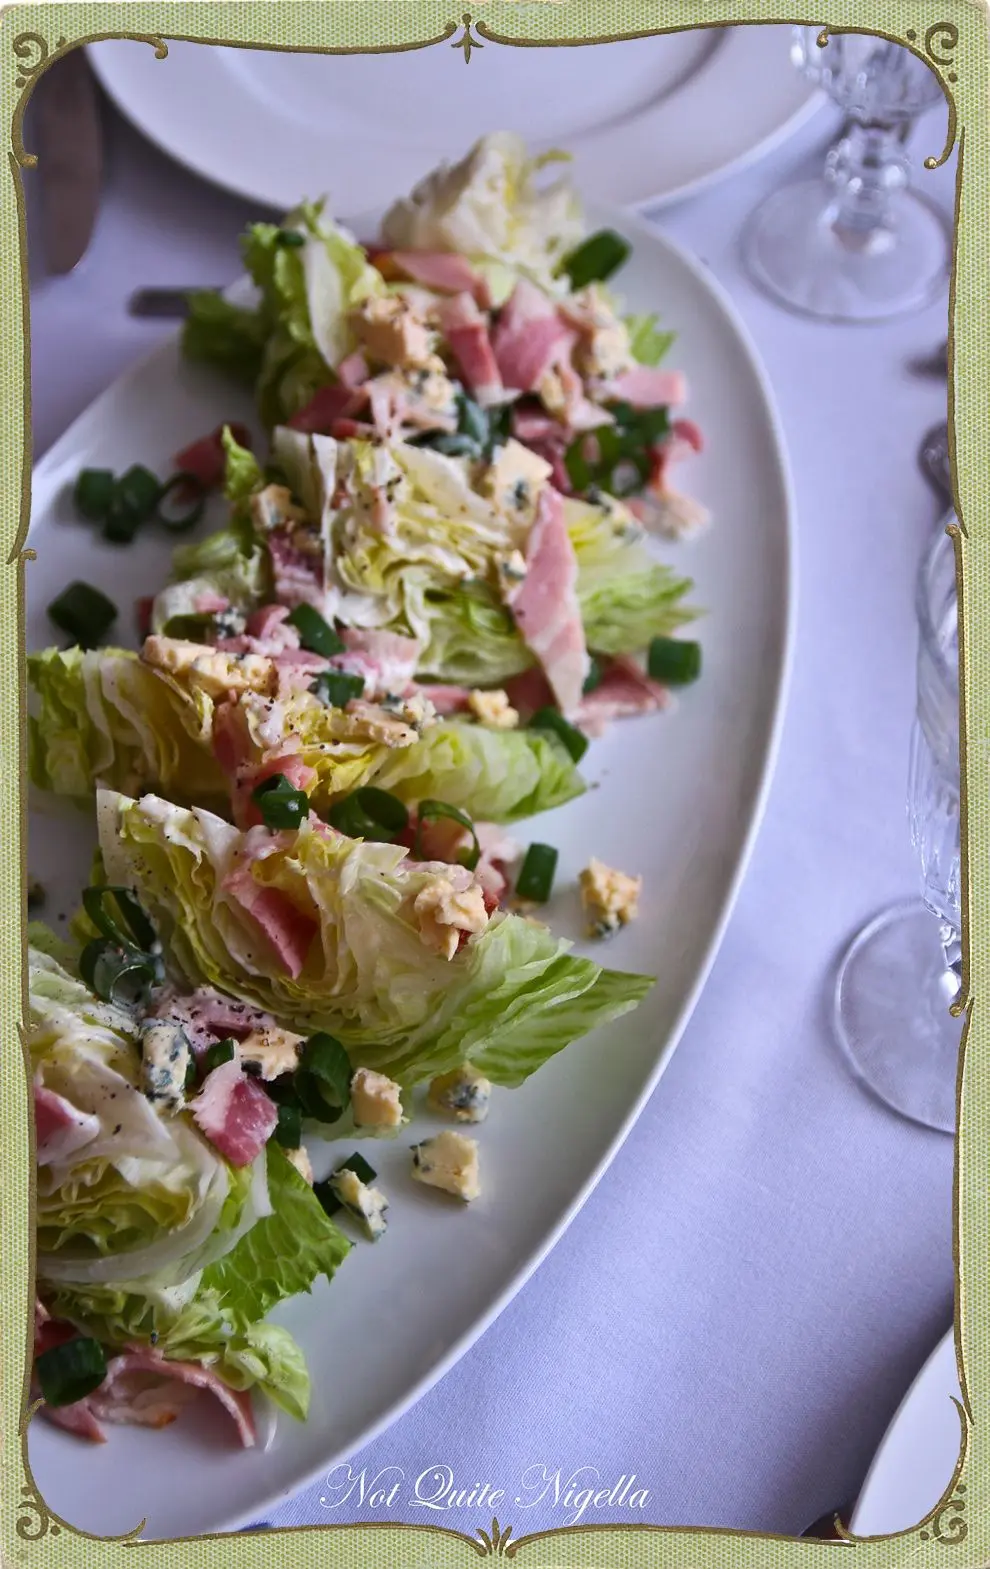
As well as another salad called a Wedge Salad with iceberg lettuce cut into wedges, served with bacon, blue cheese dressing and green onions.

christmas dinner

I also got into some low level crafting too. You perhaps won't believe how low level a crafter I am but I don't even own a hole punch-that's how low. But I figured with some pipe cleaners and some wire (i.e. bent paper clips), I could make a herb wreath. I first saw the idea for this on Celia's blog via HeidiAnnie.

I asked Mr NQN. "Why don't my things ever look as good as the stuff in the shops or one other people's blogs?"

"I don't know" he said sighing deeply with a shake of his head. Perhaps even this low hanging fruit was not low enough for me :P

christmas dinner

And no Christmas is complete without a tray of my lovely reader Matilda's cookies! Every year I hope that I'm on her list of good girls and boys and cross my fingers that these lovingly made beautiful Italian home made biscuits ends up on my doorstop.

Welcome to our Vintage Christmas!

Before we get to the recipes, I just want to say a very big thank you to all of you for reading my little blog. It's been such a pleasure to share ideas, recipes and food with all of you and your curiosity, good nature and helpfulness towards each other makes me so proud to think that you have chosen to read this blog! I've always said that my readers are truly the nicest people around! I wholeheartedly wish all of you and your families and friends a wonderful Christmas, full of love and laughter and joy and of course good food!

Lots of Love,

Lorraine (and Mr NQN dressed as Santa!)

xxx

P.S. I'd love to know Dear Reader, what are you having for Christmas lunch or dinner?

Anyway, enough of this crazy crafting! Onto our vintage Christmas!

Peppermint Hot or Iced Chocolate

christmas dinner

I would say every Antipodean (that's Australian and New Zealander if you didn't know) wishes for a cold Christmas at least once in our lives. It's supposed to snow according to every movie and television show and festive roasts are served. However, our weather is usually stinking hot around Christmas time and that's why the smarter folk have seafood and salad for Christmas. This recipe is a bit bipartisan to address this issue. You can serve this as an iced chocolate or a hot chocolate. Tell me Dear Reader, do you think any Northern Hemispherans ever dream of a hot Christmas?

Makes six cups

  • 1.5 litres full cream milk

  • 300g dark chocolate (plus a little extra to shave over the whipped cream)

  • 3 teaspoons cocoa powder

  • 1.5 tablespoons sugar

  • A few drops peppermint oil

  • Whipped cream, candy canes and glace cherries to serve (optional)

Step 1 - In a small saucepan heat the milk until almost boiling point but not quite. Add the chocolate and stir until melted and then add the cocoa powder and sugar. Do not boil the milk as you don’t want the cocoa butter to separate.

Step 2 - Pour into a cup or glass. Top with whipped cream (the one in the can is fine) and then top with candy canes and a maraschino cherry.

Mummy Turkey

Welcome to our Vintage Christmas!

When I first told my hairdresser Elly at Stevie English that I was cooking a mummy turkey, she grimaced and asked if I was going to stuff a turkey with something ancient and rotting. I realise that trying to sell any food as a "mummy" theme isn't exactly going to get people excited. But anyone that has roasted a turkey will realise how genius Angela's idea for a mummy turkey is. Originally from chef Michael Symon, this turkey needs no basting whatsoever, which is the thing that makes this delicious, lean meat really quite attention seeking. And given that Christmas is a time of heightened familial dramas and tension, let's not have another diva needing attention in the oven.

Welcome to our Vintage Christmas!

The trick is to wrap the turkey in muslin or cheesecloth and then pour stock over the muslin soaking it. It means that there's no half hourly dash to baste the thing with a contraption that makes you think of artificial insemination (or is that just me?) and it just sits there in the oven being good until it emerges golden brown underneath the strange looking layers of muslin. I would have served this at Halloween (and maybe I will) but I couldn't wait a whole 10 months. But if 2013 goes like 2012, it will be here before I know it!

  • 1 fresh turkey

  • Salt to dry brine turkey

  • 2 cups chicken or turkey stock

  • Cheesecloth or muslin (enough to wrap around the turkey three times over)

  • Stuffing of choice (see recipe below)

Step 1 - Clean turkey, removing everything inside. Check all cavities to remove included gizzards, liver, turkey neck, etc.

Salt turkey generously, wrap in plastic, refrigerate overnight.

Step 2 - When ready to roast, wash salt off. Pat dry. Allow to sit at room temperature 1 hour.

Step 3 - Use warm/cool stock. Heat up first if taking out of refrigerator. Allow to cool. Preheat oven to 318C/425F. Pat inside of turkey dry. Season with salt and pepper. Stuff turkey with your stuffing.

Welcome to our Vintage Christmas!

Step 4 - Place turkey in roasting pan, over a rack. Cover entire turkey with cheesecloth. Pour all of the turkey stock over the cheesecloth. Roast for 45 minutes at 218C/425F. Lower to 180C/350F, and roast until the internal temperature of the thigh reaches 82C/180F. I used this site to calculate the time needed to roast my turkey and it was spot on and the turkey cooked through but still moist inside. Allow to rest 30 minutes before carving.

Welcome to our Vintage Christmas!

Welcome to our Vintage Christmas!

Cutting open the cheesecloth to reveal a golden turkey

Cornbread and ham stuffing

I know the idea of baking a perfectly delicious cornbread only to crumble it up and then stuff a turkey with it sounds ludicrous to many. I happen to be on the wrong side of crazy so to me, it sounds perfectly sane. Of course you can dispense with this whole recipe and make double of the apricot stuffing or if you have leftover cornbread (I find I don't like it nearly as much the next day after baking it), then absolutely use that. But this cornbread stuffing is rather special.

Welcome to our Vintage Christmas!

For starters it's studded with a generous amount of super sweet corn and sweetened lightly with honey. Then it is crumbled up (channel any inner Christmas shopping rage) and mixed with cubes of ham. If I am to be honest, I used a couple of those strange ham steak things that come four to a packet. The last time I ate one was with a ring of pineapple at a countryside diner about 8 years ago. I think an 8 year gap between ham steaks sounds about right.

For cornbread-enough to stuff a giant turkey and then some

  • 1 cup plain all purpose flour

  • 1 cup cornmeal or polenta

  • 1 tablespoon baking powder

  • 1 teaspoon salt

  • 1/2 cup grated cheese

  • 1 cup buttermilk (or regular milk soured with a tablespoon of lemon juice)

  • 1/4 cup oil (plus extra to grease tin, I used a Grove avocado oil which is why it is green)

  • 1/4 cup honey

  • 1 egg

  • 420g/14.8 oz. tin of corn kernels (I like the super sweet variety)

For the rest of the stuffing

  • 3 large onions, finely chopped

  • 2 cloves garlic, finely chopped

  • 2 tablespoons butter for frying

  • 1 cornbread (above)

  • 375g ham steaks, diced

  • 3 eggs

  • 100ml cream

  • fresh lemon thyme or thyme (to taste)

  • Salt and pepper

Step 1 - Preheat oven to 220C/440F. Line a loaf tray with parchment paper or grease with oil. In a large bowl, whisk the dry ingredients (flour, cornmeal, baking powder and salt) and then stir in the cheese. In a jug, whisk the buttermilk, oil, honey and egg together and using a spoon mix it all together. Add the drained corn kernels and stir to combine. Pour into the prepared tin and bake for 25-30 minutes until a skewer inserted comes out clean. Cool so that it can be handled (you can make this up to 3 days ahead of time).

Welcome to our Vintage Christmas!

Step 2 - In a frypan, heat some butter and fry the onions and garlic until soft on low to medium heat, stirring so that it doesn't catch on the bottom of the pan. It takes about 10-15 minutes to get them soft and sweet.

Welcome to our Vintage Christmas!

Step 3 - Meanwhile, crumble the cornbread and add this to a large bowl along with the diced ham. Beat 3 eggs with the cream and add this and then add herbs, salt and pepper. Add the onions and garlic when they are done.

Home made cranberry sauce

christmas dinner

It never occurred to me to make my own cranberry sauce because of course that's one thing that you can easily buy and save about 15 minutes of your time. But I have a sickness and that involves suddenly deciding in the midst of everything that making your own cranberry sauce would be a great idea! And that was even before I hit the eggnog!

  • 100g/3.5 ozs dried cranberries

  • 3/4 cup orange juice

  • 1/3 cup white sugar

  • 1 cinnamon stick

  • a pinch salt

Step 1 - Place all ingredients in a saucepan and simmer for 15 minutes. Allow to cool

Wedge Salad

christmas dinner

The first time I heard of this was on Modern Family. A whole episode was devoted to the Wedge Salad (was there a Wedge Salad Association that had sponsored the show?). I know iceberg lettuce is a bit last century but then again, so am I so I continue to love the crunch and freshness from a good iceberg. The Wedge Salad is usually served with a blue cheese dressing and bits of bacon and spring onions. If blue cheese isn't your thing, a caesar-y dressing is suitable. If that isn't your thing, then I can suggest eating a lettuce like Mr NQN's family used to eat cabbages for dinner. That is, his mum would set a whole cabbage down on the dining room table and each child would peel a leaf off and eat it straight. See, blue cheese doesn't sound so bad does it? ;)

Serves 6

  • 120g blue cheese

  • 2/3 cup buttermilk

  • 2 tablespoons mayonnaise

  • 1 teaspoon chardonnay or wine vinegar

  • salt and pepper

  • 1 ice berg lettuce

  • 120g cooked bacon, chopped

  • 1/2 cup shallots, chopped

  • Parmesan cheese

Step 1 - In a food processor, place the blue cheese, buttermilk and mayonnaise and blend. Add the vinegar and salt and pepper to taste.

Step 2 - Cut the lettuce into six wedges and gently separate the leaves a little. I place the dressing in one of those squeezy bottles which allows you to get the dressing a bit between the layers. Dress the lettuce between the layers (wedge salad is really best served per person as it's hard to divide at the table). Sprinkle with bacon bits, shallots and parmesan cheese.

Sweetcorn Coleslaw

christmas dinner

I always have a batch of coleslaw in the kitchen and this week it is cabbage coleslaw instead of cauliflower as I bought a massive 5.5 kilo cabbage. When I was walking to the car holding my cabbage in plain view because there was no bag big enough to hold it, people stopped and stared at me and some commented on the humongous size of my appendage. I felt a bit sexually harassed until I realised that it was really just the cabbage and not me...

  • 5-6 cups of cabbage, thinly shredded

  • 2 medium carrots (about 180grams)

  • 1 cup tinned sweet corn (use the Edgells super sweet one)

  • 1 cup chopped green onions/shallots

  • 4 tablespoons mayonnaise

  • 4 tablespoons milk (not soy)

  • 1/2-1 tablespoon mustard (depending on how hot your mustard is)

  • Juice of half a lemon

  • salt and pepper to taste

Step 1 - Grate the carrots into a large bowl (you can peel these first but I like to keep the skin on, just wash them well). Then remove the stem from the cabbage and with a large knife, slice thinly. Add this to the bowl. Add the onion to the mix and with two spoons, mix the vegetables so that they are evenly distributed.

Step 2 - In a bowl, add the mayonnaise, milk and mustard and using a small whisk or fork to combine. Pour this in two batches over the shredded vegetables and toss between additions. Add the lemon, salt and pepper and toss some more to combine and taste for seasoning. I like this best when it has sat for a little while but you can eat it straight away too.

Pan Buttered Rice

Welcome to our Vintage Christmas!

This was for my father who once left a holiday in Japan because he couldn't find the right kind of rice there (I wish I were kidding). Although he has relaxed and now enjoys Thai Jasmine and Basmati on occasion, I thought I'd expand his horizons even more with this garlicky pan buttered rice. The inspiration for this pan buttered rice was from the shrimp trucks on the North Shore of Oahu that serve a fantastic garlic butter rice with their shrimp (prawns).

  • 2.5 cups chicken stock, hot

  • 4 teaspoons chicken powder

  • 100g/3.5 ozs. butter

  • 1.5 cups jasmine or basmati rice

  • 4 garlic cloves, chopped

Step 1 - Dissolve the chicken powder in the hot chicken stock. Melt the butter in a saucepan and then top with the stock and rice and then turn down the heat and place the lid on the pan tightly so that the liquid evaporates. After about 10 minutes, it should have disappeared. Stir around the rice moving the rice from the top to the bottom and add the garlic in and keep the lid on for another 5 or 10 minutes.

Star Lavosh

christmas dinner

"Will we have enough food?" I asked in panic. It's a question I ask before every time guests come over and no guests have ever starved. Still, I continue to make food as if it were the last days on earth (which was supposed to be only a few days ago). This is a chilli and sesame lavosh shaped into stars to go with the baby cheeses (aka baby Jesus, a Kath & Kim joke, did anyone get that?).

  • 1.5 cups plain all purpose flour

  • 2 tablespoons sesame seeds

  • 1 teaspoon salt

  • 1 teaspoon white sugar

  • Pinch of chilli flakes (more if you like it spicy)

  • 1/2 cup warm water

  • 1/4 cup oil

  • 1 teaspoon sesame oil

Step 1 - Preheat the oven to 175C/347F. Line two trays with baking parchment (you will make four lots but you can make them after each other but line four trays if you want) and take out a rolling pin and a butter knife. In a bowl, add the flour, sesame seeds, salt, sugar and chilli flakes and with a fork, stir to combine. In a jug, measure the warm water, oil and sesame oil and add this to the flour mix. Using a fork combine these and knead gently for about 30 seconds.

Step 2 - Divide the dough into four pieces. Roll these out with the rolling pin and cut out using a star shaped cutter. The dough is best when rested for about 10 minutes or more although you can roll it again straight away. Bake until golden-about 15-20 minutes depending on thickness but check for colour after 15 minutes. Cool completely and store in an airtight container.

Hasselback Potatoes

Welcome to our Vintage Christmas!

Inevitably, I think of two people whenever I make these potatoes: David Hasslehoff and Elisabeth Hasselbeck. Which is why I only make them once every ten years or so. I used the goose fat from last year's Christmas goose and I know we already have rice but Christmas is also about lulling everyone into a carb coma. They're less likely to fight that way...

  • 2 kilos of small chat potatoes

  • 1/2 cup goose fat (or a 50:50 combo of butter and oil)

  • 2 tablespoons polenta

  • Salt and pepper

  • Sour cream

  • 1 teaspoon Rosemary or coriander, chopped

  • Chilli flakes to taste

  • Salt and pepper

Welcome to our Vintage Christmas!

Step 1 - Preheat oven to 200c/400F. Wash the potatoes but don't peel them. Using a large spoon as a cradle, make parallel cuts through each potato being careful not to cut all the way through the bottom. Heat the goose fat in a large bowl and gently toss in the melted goose fat. Sprinkle with polenta.

Step 2 - Roast in the oven alongside the turkey for about an hour (check to see doneness) and then serve with a dollop of sour cream mixed with rosemary and chilli flakes.

Snow Globe Cake

christmas dinner

I really started off with the best intentions for this cake. It was a simple enough idea, a cake layer on the bottom holding up an upside down fish bowl with a snowman and a tree inside. The cake was an easy enough mud cake flavoured with peppermint as that's a little bit of a theme here with the hot or iced peppermint chocolates. I iced it with ganache (not very well but I was having a serious moment in this heat) and then the chocolate plastique modelling chocolate layer struck. I had faced it before during a Daring Bakers Battenberg cake challenge but I determined to find a way to make it work.

After almost giving up again I realised my error-not putting enough glucose syrup into the mix. I thought back to the Daring Bakers challenge and it was either a love or hate relationship. You either got an icing that looked like dried dog poo or the proper icing. If you don't add enough syrup, then it's mostly hard poo-like chocolate once set so you really need the syrup to make it pliable. Once I got it, I loved the icing and it's truly one of the easiest to make once you get the ratio down.

For chocolate peppermint mud cake

  • 300g butter

  • 200g chocolate (milk or dark)

  • 2.5 cups caster or superfine sugar

  • 1 1/3 cups water

  • a few drops peppermint essemce

  • 2 cups plain all purpose flour

  • 1 teaspoon baking powder

  • 2 eggs, beaten lightly

  • You will also need two tins, one slightly smaller than the other. I used a 19cm and a 22cm cake tin.

For chocolate ganache

  • 350g dark or bittersweet chocolate

  • 6 tablespoons pure cream (not light)

For chocolate plastique modelling chocolate*

  • 400g dark or bittersweet chocolate

  • 2/3 to 3/4 cup corn syrup or glucose syrup

  • Please note: is best made a day or a few hours ahead

To decorate

  • A clear fish bowl (don't ditch your fish for this, you can buy them at discount stores for about $15)

  • 100g white fondant for snowman

  • a tiny amount of orange fondant for his nose

  • A rainbow sour for his scarf (you can also use fondant)

  • I also used extra modelling chocolate for his eyes, hat (brim was made using a chocolate melt)

  • 1 ice cream cone

  • A small quantity of buttercream (or butter if you don't have buttercream ready!)

  • Desiccated coconut

  • Green food colouring

  • A bird. A bit random but I wanted something colourful under the snow globe and it sort of fit proportion wise (sort of)

  • Sugar for snow inside globe

Step 1 - First of all make the figurines as they, particularly the snowman, will need to set. Make the snowman by rolling two large balls of white fondant and securing them together with a toothpick. Use the sour leather as a scarf and shape a little carrot nose out of orange fondant and use the chocolate modelling fondant for the hat and a chocolate disc for the brim (these can be done later once the modelling chocolate has been done). Make the tree by spreading an ice cream cone with butter. In a ziplock bag mix the desiccated coconut with green food colouring, seal and shake. Then roll the buttered cone in the coconut (please note, if it is very humid like it is in Australia at the moment, do this at the last minute as the cone may wilt).

Welcome to our Vintage Christmas!

Step 2 - Preheat the oven to 170C/340F. Line the two tins on the base and sides with parchment. In a saucepan, melt the butter, chocolate, sugar and water over low heat until melted and smooth. Cool for about 15 minutes and whisk in flour, baking powder and eggs. Add peppermint essence according to taste.

Step 3 - Divide into tins-I put two thirds of the batter in the larger tin and the remaining third in the smaller tin. Bake for about 1 hour and 10 minutes for the smaller tin and about a total of 1 hour 30 minutes for the larger tin. Cool in tin and wrap in cling wrap once completely cooled. When ready, trim the tops of the cakes which will have crunchy edges.

Step 4 - Make the ganache by melting the chocolate over a double boiler or in a microwave on 60 second 50% power bursts. Stir in the cream until well combined and if necessary, refrigerate until spreadable. Spread the ganache on the bottom cake filling in any crevasses and then place the second cake on top and spread ganache over this one too. Refrigerate and allow ganache to set (about 30 minutes or so). Then take a clean angled palette knife dipped briefly in warm water and smooth again using firm strokes to give the ganache a glossy finish. Refrigerate until needed.

Step 5 - To make modelling chocolate, melt the chocolate over a double boiler or in a microwave on 60 second 50% power bursts. Stir in the glucose or corn syrup-it will become grainy and pull away from the sides of the bowl which is good. Place in a zip lock bag at room temperature for at least two hours. Knead with your hands as the heat will make it soft. I've also put it in a mixer with a dough hook and that works too although hands are better albeit messier.

Step 6 - Tear out a large sheet of baking parchment and roll the modelling chocolate into a ball. Roll out as thin as you can get it without it breaking-it's a large cake so you don't want to go too thin. Gently turn the parchment with the modelling chocolate on it upside down and ease it over the cake. With clean hands gently massage the modelling chocolate-it moves and melts easily under the hands and trim away any excess pieces. Make sure the edges are cut away and what's left is tucked in.

Welcome to our Vintage Christmas!

Step 7 - With a plain water spray set on the "mist" setting, spray inside the fish bowl on the sides and top leaving a space unsprayed as this is where the front of the snow globe will be and where everyone will see your figurines. Sprinkle with white sugar and allow to set. Place figurines on top and carefully lower the bowl onto it. Place a ribbon on top if you like. Fall asleep on the couch while guests arrive and prop yourself up from exhaustion with a glass of peppermint hot chocolate while vowing never to host Christmas again. Until next year of course...

Welcome to our Vintage Christmas!

A kiss goodbye from my nephew Jason!

christmas dinner

Published on by .

Reader Comments

Loading comments...

Add Comment

Your email is never published nor shared. Required fields are marked*