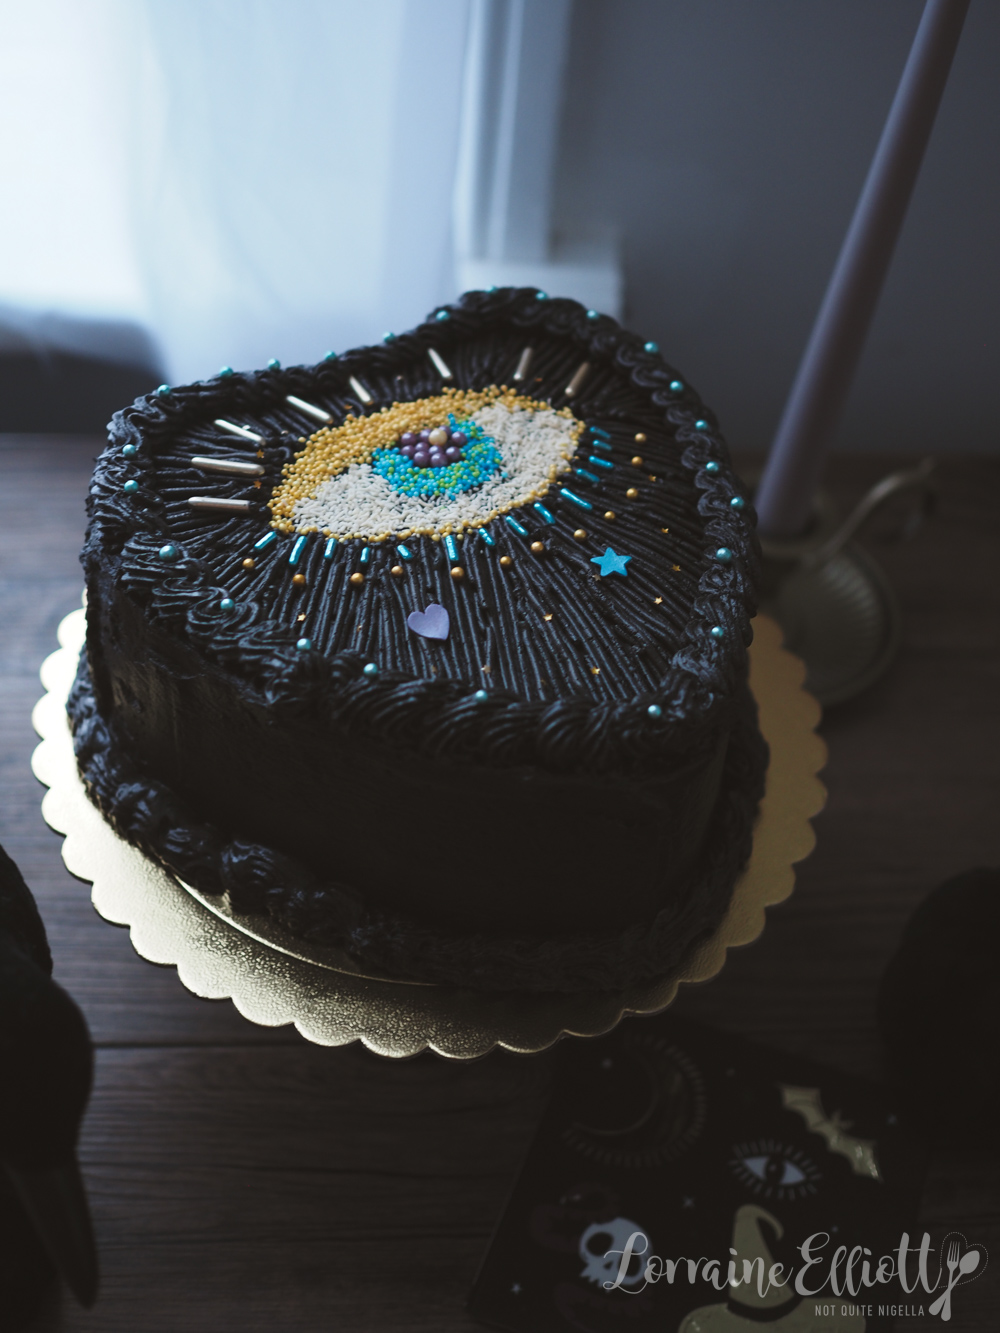
This spooky Halloween showstopper cake is made with moist red velvet mud cake covered in silky black cocoa buttercream and decorated with shimmering gold and blue sprinkles to form a mystical evil eye. Inspired by the Greek Evil Eye it's the perfect magical centrepiece for any Halloween party!
About This Halloween Evil Eye Cake
Beware the all seeing evil eye cake! This bewitching buttercream red velvet mud cake is decorated with an evil eye emblem. This cake is based on the Greek Evil Eye and it is believed that when someone is envious of you they try to curse you with an evil or malevolent glare and this sends bad luck your way. You counter this by wearing an amulet or charm with an eye that never blinks and is therefore always watchful!
On the outside of this cake is a silky black buttercream made using black cocoa and we use edible sprinkles in gold and blue to make the eye. And you know what? It's not as complicated as it looks! The base of this cake uses my white chocolate mud cake recipe as it is moist, delicious and vivid red too. It is also really easy to make and did I mention it stays moist for up to 1 week!
I love evil eye amulets so much that I have an evil eye necklace that I never remove and if I see anything with the evil eye I am immediately drawn to it. But this also reminds me of a planchette in a ouija board (remember my planchette cookies?)!
I was inspired to make this by Laurenjanebakes who was inspired by xochiltsdesserts on Instagram.
Video How To Make A Halloween Evil Eye Cake
Video: How to Decorate a Halloween Cake With an Evil Eye Motif!
Tips For Making Halloween Evil Eye Cake
1 - I like using a chocolate mud base because it is easy to sculpt and stays moist for up to a week (covered of course). And I give it a Halloween twist by making it a red velvet coloured.
2 - This cake batter is a very runny batter so it is not suitable for a sprinform pan as it will leak through.
3 - If you add in the wet mix to the dry too quickly you will get lumps so make sure to add it very slowly. If it is too late and you have lumps you can always pass the batter through a sieve to remove lumps. Just make sure to press the flour back in through the sieve back into the main mixture (i.e. don't leave any lumps of flour in the sieve).
4 - The cake is best made the day before so that it has time to firm up.
5 - I am using my favourite buttercream recipe. This is a silky buttercream and different from American buttercream that uses icing or powdered sugar. This buttercream recipe uses caster or superfine sugar. It doesn't crust up or crack and is great for piping as it is softer so it doesn't hurt your hands (when you do a lot of piping it makes a difference)!
6 - We use black cocoa to using black food colouring becayse it gives a real chocolatey flavour without artificial food dyes. But if you can't access black cocoa by all means use a fat soluble or oil based black food colouring and regular cocoa powder. I mean it's not like we are averse to using food colouring in a red velvet cake! ;)
7 - Use a strong cake board for this as the cake is quite heavy and a flimsy cake board won't support it.
8 - The sprinkles really make this cake special. I used a range of different sprinkles, some of which I already had, others I bought to make this cake: Gold rods for top Eyelashes, Gold Stars for under the eye, Blue Jimmies for bottom eyelashes, Blue metallic cachous for around the edge of the cake, Green and Blue non pareils for the iris, Gold nonpareils or sprinkles for eyelid and eyeliner, White jimmies for the sclera or white of the eye and Heart and Star Sprinkles to decorate and dark purple cachous for the pupil. I bought most of them from the Sprinks brand.
9 - This cake can be kept in an airtight container at room temperature for up to 1 week. If it is very hot where you are, it can also be stored in the fridge.
10 - To freeze this cake, place the cake uncovered in the freezer for 1 hour or until the buttercream is frozen hard. Then wrap in cling film and foil. Freeze for up to 2 months. When it comes to defrosting, you can do this in the fridge or on the counter, just remove the foil and cling film while it is still frozen. This buttercream doesn't crust (which is why I love it so much!).
Preparation time: 75 minutes plus overnight resting time
Cooking time: 120 minutes
Serves: 12-14 people
The cake part if best made 1 day ahead
Ingredients Needed
For Cake:
500g/17.6ozs. butter
375g/13.2ozs. white chocolate
3 cups/660g/23.3ozs caster or superfine sugar
3 cups/750ml/0.8 quart water
3 eggs, at room temperature
3 tablespoons Lorann Red Velvet food colouring
3 cups/450g/1lb cake flour
3/4 cup/112g/4ozs cornflour/fine cornstarch
2 teaspoons baking powder
For Buttercream Frosting:
375g/13.3ozs. butter, room temperature
190g/6.7ozs. caster sugar
115ml/4flozs. water, room temperature (test on wrist)
3/4 cup black cocoa
1 teaspoon vanilla extract
Step-By-Step Instructions
Step 1 PREPARE - Preheat oven to 150c/300F. Line two 8x8 inch heart shaped baking tins with parchment.
Step 2 MELT - Place the butter, white chocolate, sugar and water in large pot on low heat and stir until melted and combined. Cool for 10 minutes.
Step 3 WHISK - Whisk in the red food colouring and eggs. Then in a large bowl whisk together the flour, cornflour, cocoa and baking powder. Very, very gradually add in the wet batter to the dry mixture. If you add this in too quickly you will get lumps. This is a large batter mix so make sure to get the bits of flour at the bottom.
Step 4 BAKE - Bake for 1 hour and then cover with foil and bake for another 30-40 minutes or until a skewer inserted comes out clean. Cool in tin. Once cold, cover with cling film.
Step 5 FROSTING - Fit a beater attachment to your mixer and beat the butter, sugar and cocoa together on the lowest speed for 1 minute (cover it with a teatowel so you don't get cocoa everywhere). Then once the black cocoa is incorporated, increase the speed to 3 out of 10 for 3 minutes. Add the water and vanilla in at low speed and beat at speed 3 for another 5 minutes or until you can no longer feel the sugar grains between your fingers. Cover with cling film.
Step 6 CRUMB COAT - Take 3/4 cup of frosting and place it in a bowl. Trim the tops off the cakes until even and place one cake on a cake board. Smooth some icing over this. Then place the other cake on top. Cover with a thin coat of frosting all over the cake as well as filling any gaps between the cake. Refrigerate uncovered for 30 minutes until buttercream sets hard.
Crumb coat
Step 7 FINAL COAT - Add another coat of buttercream on top of the cake and sides using a cake smoother to smooth it over. This takes time so don't rush this part. You want it to be even on all sides and the top.
Step 8 PIPING - Using a toothpick trace a large eye on top in the buttercream to use as a guide. Using a small plain tip #1 fill a piping bag and pipe stripes starting at the eye and going to the end. Then switch to a small star tip and pipe around the edge in small circles back and forth (see video above for the piping motion).
Step 9 SPRINKLES - I like to use a small teaspoon and tweezers to apply the sprinkles. Use gold sprinkles for the upper and lower eyelid. Use white jimmies for the sclera. Use a mix of blue and green for the iris and use dark purple or black pearls for the pupil. Use the gold rods for the upper eyelashes and smaller blue rods for lower eyelashes. Use tiny stars, heart and star for under the eye area. Use blue metallic cachous for around the edge.
This cake is suitable to freeze in case you want to eat it later. See instructions above.
Substitution notes and ingredients:
Black cocoa is a specific type of cocoa found at speciality baking stores. You can sub this with regular cocoa and black food colouring (make sure the black food colouring is fat soluble or oil based).
Lorann Red Velvet Emulsion is the best food colouring for making red velvet cake as it adds a real intensity and doesn't add much flavour. Supermarket colourings generally are not strong enough to make a red velvet cake. You can of course use a red velvet cake mix too.
Personal Note
While this is a great Halloween party cake I'm actually going to give this to Mr NQN's newphew Finn for his birthday that falls a couple of weeks before Halloween. It has been a very hectic and stressful year so I'm not quite up for a Halloween party this year (also I have some PTSD from the moth invasion that started when moths came in because people kept leaving the screen door open during one Halloween party).
Kids love these sorts of spooky cakes and for my birthday this year Finn had drawn me a birthday card that showed what he thought of with me. It was a cake with a face on it and candles. There was also cookies and ice cream and on it. Kids are terrifying because they're so honest and have little guile. Clearly I was the aunt that brings dessert with her and that's fine with being identified that way!
So tell me Dear Reader, how would a kid describe you? Do you wear any evil eye amulets or jewellery?
This post contains affiliate links. These help earn me a small commission at no added cost to you.
Mystical Halloween Evil Eye Cake was written by Lorraine Elliott and published on Wednesday, October 15, 2025 in
Delicious Recipes,
Cake Recipes and
Halloween.


Reader Comments
Loading comments...Add Comment